

Deploying SUSE K3s 3-Node Cluster with Rancher
on Ampere® Altra® Platforms
Overview
This tutorial guide intends to explain the deployment of SUSE K3s 3-node compact cluster on the Ampere Altra platform. The installation of Rancher for K3s cluster management, Longhorn for block storage, Nginx Ingress Controller for ingress, and Prometheus and Grafana for collecting and presenting metrics are described in the following sections. K3s is a CNCF sandbox project that delivers a lightweight certified Kubernetes distribution. There is SUSE Rancher for managing and running production workloads across the cluster. The diagram below shows the network overview with four nodes: K3s 3-node cluster and a bastion node. For running Video-on-Demand service workload on the cluster, use Nginx Ingress Controller instead of Traefik as the ingress service, and the named (from BIND) is deployed on the bastion node for the ingress endpoints of two pods of the Nginx web server and Nginx VOD container.
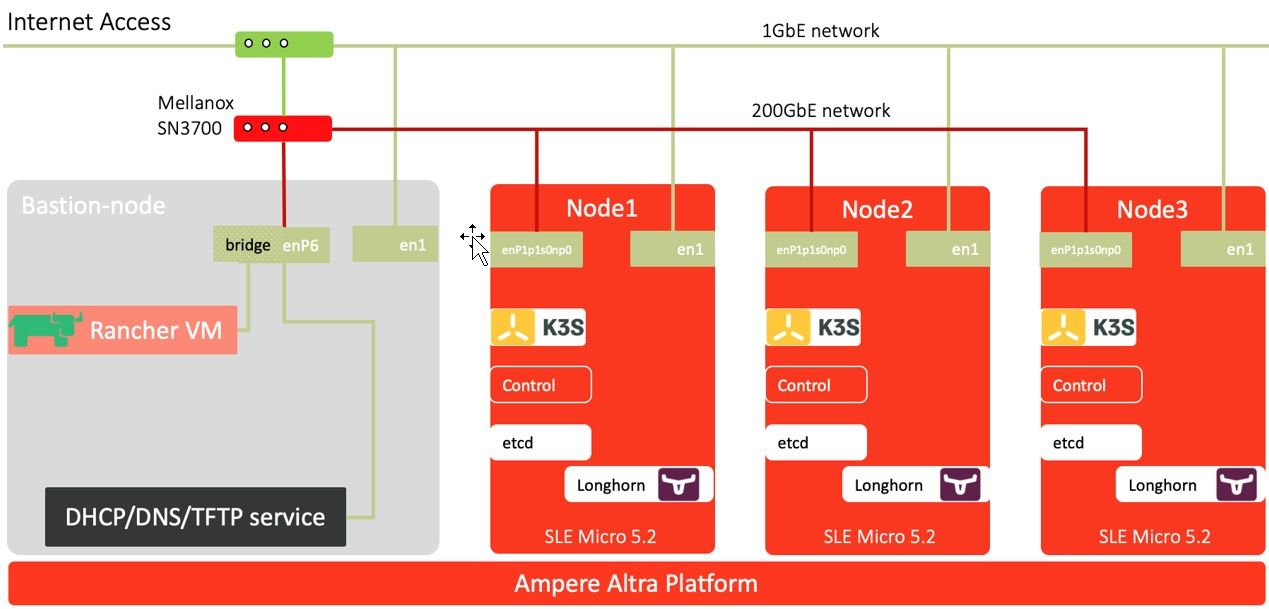 Figure 1: Network Overview of SUSE Rancher K3 3-node Cluster
Setup Instructions
Refer to the following steps to install K3s without Traefik:
1. For the servers provisioned with SUSE Linux Enterprise (SLE) Micro 5.2, ensure the drives for NICs are up to date. If you want to deploy K3s on other Linux distributions, refer to https://www.suse.com/suse-rancher/support-matrix/all-supportedversions/ rancher-v2-6-5/ for the Rancher K3s support matrix.
2. Deploy K3s on the first node (node1) and disable “traefik.” Based on the support matrix, choose K3s version 1.23.6+k3s1.
node1 ~$ export INSTALL_K3S_EXEC=”server --no-deploy traefik --cluster-init --write-kubeconfigmode= 644” node1 ~$ export K3s_VERSION="v1.23.6+k3s1" node1 ~$ curl -sfL https://get.k3s.io | \ INSTALL_K3S_VERSION=${K3s_VERSION} \ INSTALL_K3S_EXEC=${INSTALL_K3S_EXEC} \ sh -s -
3. For the servers provisioned with SLE Micro 5.1 or later, reboot the system when the K3s installer shell script completes the installation.
$ sudo reboot
4. Retrieve the access token for the K3s cluster when the system is up and running.
node1 ~$ sudo cat /var/lib/rancher/k3s/server/node-token xxxxxxxxxxxxxxxxxxxxxxxxxxxxxxxxxxxxx::server:xxxxxxxxxxxxxxxxxxxxxxxxxxxxxxxxxxxxx
5. On the other two nodes (e.g., node2 and node3), clean up the previous installation of K3s, if any.
node2 ~$ sudo /usr/local/bin/k3s-uninstall.sh node2 ~$ sudo reboot
6. Add NODE_TOKEN and FIRST_SERVER in the script to include the two nodes into the cluster with the first node. Install K3s on the other node.
node2 ~$ export INSTALL_K3S_EXEC="server --no-deploy traefik" node2 ~$ export FIRST_SERVER_IP="10.76.85.101" node2 ~$ export NODE_TOKEN="xxxxxxxxxxxxxxxxxxxxxxxxxxxxxxxxxxxxx::server:xxxxxxxxxxxxxxxxxxxxxxxxxxxxxxxxxxxxx " node2 ~$ export K3s_VERSION="v1.23.6+k3s1" node2 ~$ curl -sfL https://get.k3s.io | \ INSTALL_K3S_VERSION=${K3s_VERSION} \ K3S_URL=https://${FIRST_SERVER_IP}:6443 \ K3S_TOKEN=${NODE_TOKEN} \ K3S_KUBECONFIG_MODE="644" INSTALL_K3S_EXEC=${INSTALL_K3S_EXEC} \ sh -
7. Repeat step 3 (for the servers provisioned with SLE Micro 5.1 or later, reboot the system when the K3s installer shell script completes the installation). Otherwise, the cluster should be up and running.
node2 ~$ sudo reboot
8. Execute kubectl to check the nodes’ readiness. If their status is “Ready,” a 3-node compact cluster is ready!
node1 ~$ kubectl get nodes NAME STATUS ROLES AGE VERSION node1 Ready control-plane,etcd,master 55m v1.23.6+k3s1 node2 Ready control-plane,etcd,master 31m v1.23.6+k3s1 node3 Ready control-plane,etcd,master 10m v1.23.6+k3s1
9. To access the k3s cluster from the bastion node, the k3s.yaml is under /etc/rancher/k3s. Replicate it under your home directory as ~/.kube/config.
node1 ~$ cp /etc/rancher/k3s/k3s.yaml ~/kubeconfig node1 ~$ scp ~/kubeconfig altrauser@10.76.85.104:./.kube/config node1 ~$ ssh altrauser@10.76.85.104 [altrauser@mtsnow ~]$ kubectl get node NAME STATUS ROLES AGE VERSION node1 Ready control-plane,etcd,master 6h15m v1.23.6+k3s1 node2 Ready control-plane,etcd,master 5h39m v1.23.6+k3s1 node3 Ready control-plane,etcd,master 5h26m v1.23.6+k3s1
Install Nginx Ingress Controller on K3s
1. Since there is no Traefik as an ingress controller, choose the right version of the Nginx Ingress Controller for supporting K3s. In this PoC, it is version 1.1.0. It will create an ingress-nginx namespace. Also, you will need a patch for this deployment using a DNS load balancer.
$ kubectl apply -f https://raw.githubusercontent.com/kubernetes/ingress-nginx/controller-v1.1.0/deploy/static/provider/baremetal/deploy.yaml $ cat > ingress.yaml <<EOF spec: template: spec: hostNetwork: true EOF $ kubectl patch deployment ingress-nginx-controller -n ingress-nginx --patch "$(cat ingress.yaml)" deployment.apps/ingress-nginx-controller patched
2. In the DNS load balancer use case, increase the number of ingress-nginx-controller pods to 3 by editing the “replicas” to 3.
$ kubectl get deployment -n ingress-nginx NAME READY UP-TO-DATE AVAILABLE AGE ingress-nginx-controller 1/1 1 1 19s $ kubectl edit deployment ingress-nginx-controller -n ingress-nginx ... # apiVersion: apps/v1 kind: Deployment metadata: annotations: deployment.kubernetes.io/revision: "2" .. generation: 8 labels: app.kubernetes.io/component: controller app.kubernetes.io/instance: ingress-nginx app.kubernetes.io/managed-by: Helm app.kubernetes.io/name: ingress-nginx app.kubernetes.io/version: 1.1.0 helm.sh/chart: ingress-nginx-4.0.10 name: ingress-nginx-controller namespace: ingress-nginx .. spec: progressDeadlineSeconds: 600 replicas: 3 #### <--- here revisionHistoryLimit: 10 selector: matchLabels: app.kubernetes.io/component: controller app.kubernetes.io/instance: ingress-nginx app.kubernetes.io/name: ingress-nginx strategy: rollingUpdate: maxSurge: 25% maxUnavailable: 25% type: RollingUpdate template: metadata: creationTimestamp: null labels: app.kubernetes.io/component: controller app.kubernetes.io/instance: ingress-nginx app.kubernetes.io/name: ingress-nginx
3. Verify the deployment update is complete and ensure an ingress-nginx-controller is on each node.
$ kubectl get deployment -n ingress-nginx NAME READY UP-TO-DATE AVAILABLE AGE ingress-nginx-controller 3/3 3 3 1m $ kubectl get pods -n ingress-nginx NAME READY STATUS RESTARTS AGE ingress-nginx-admission-create-jm5nd 0/1 Completed 0 1m ingress-nginx-admission-patch-c8wt8 0/1 Completed 1 1m ingress-nginx-controller-7b8496bf47-59r5q 1/1 Running 0 50s ingress-nginx-controller-7b8496bf47-ltp6r 1/1 Running 0 50s ingress-nginx-controller-7b8496bf47-vm5hs 1/1 Running 0 1m $ kubectl get pods -n ingress-nginx -o wide NAME READY STATUS RESTARTS AGE IP NODE NOMINATED NODE READINESS GATES ingress-nginx-admission-create-jm5nd 0/1 Completed 0 2m 10.42.2.4 node3.k3s.hhii.amp <none> <none> ingress-nginx-admission-patch-c8wt8 0/1 Completed 1 2m 10.42.2.5 node3.k3s.hhii.amp <none> <none> ingress-nginx-controller-7b8496bf47-59r5q 1/1 Running 0 1m 10.76.85.101 node1.k3s.hhii.amp <none> <none> ingress-nginx-controller-7b8496bf47-ltp6r 1/1 Running 0 1m 10.76.85.102 node2.k3s.hhii.amp <none> <none> ingress-nginx-controller-7b8496bf47-vm5hs 1/1 Running 0 2m 10.76.85.103 node3.k3s.hhii.amp <none> <none>
Note: For other instructions, create a new namespace like nginx-ingress for all namespaces or pre-defined namespaces. In this case, the ingress-nginx namespace is created and used.
Install Rancher
In this instruction, use docker to run the rancher v2.6.4 container image on ports 443 and 80 by referring to the following steps. Note: A bootstrap password is required to access the Rancher web UI. For the production, run Rancher on a 3-node K8s cluster for High Availability (HA) instead of a single node or VM with docker.
$ sudo docker run -d --restart=unless-stopped -p 80:80 -p 443:443 --name rancher26 --privileged rancher/rancher:latest $ docker ps CONTAINER ID IMAGE COMMAND CREATED STATUS PORTS NAMES fbf6db201863 rancher/rancher:latest "entrypoint.sh" 2 minutes ago Up 2 minutes 0.0.0.0:80->80/tcp, :::80->80/tcp, 0.0.0.0:443->443/tcp, :::443->443/tcp rancher26 $ docker logs rancher26 2>&1 | grep "Bootstrap Password" 2022/05/11 03:47:24 [INFO] Bootstrap Password: xxxxxxxxxxxxxxxxxxxx
Import K3s Cluster to Rancher
1. Login to Rancher web UI. Click Import Existing.
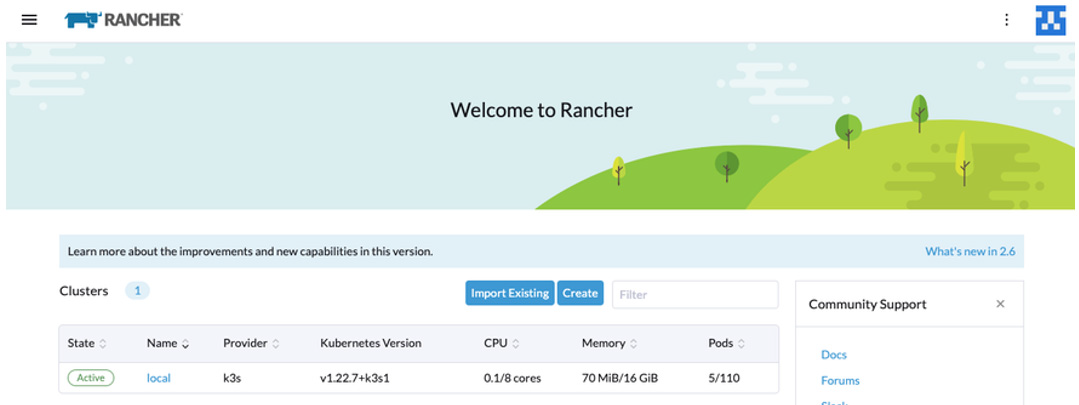 Figure 2: Rancher - Dashboard of Clusters
2. Click Generic.
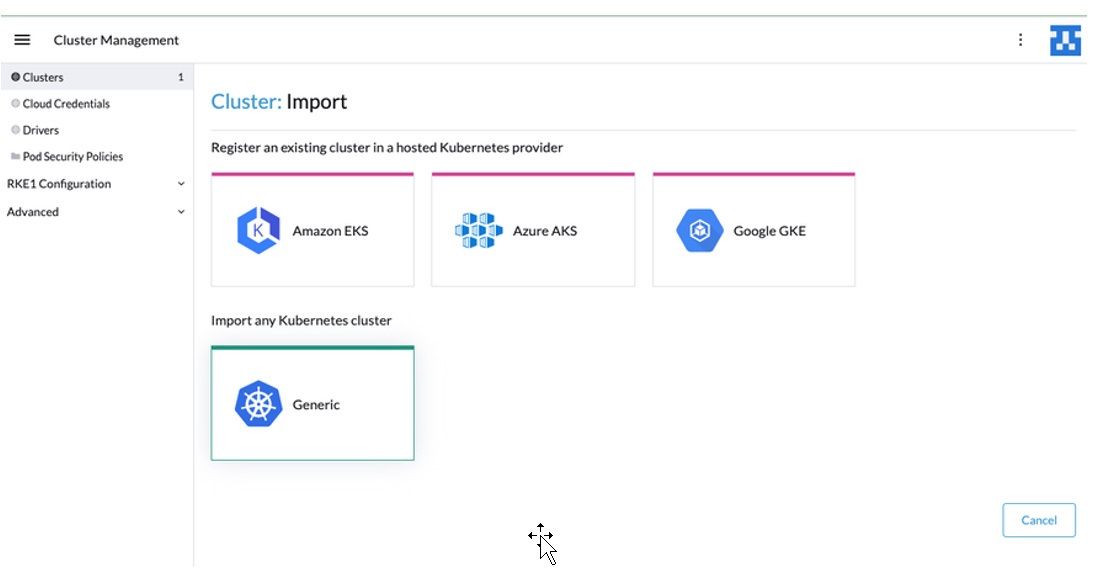 Figure 3: Import K3s as a Generic Kubernetes to Rancher
3. Enter the Cluster Name and Description.
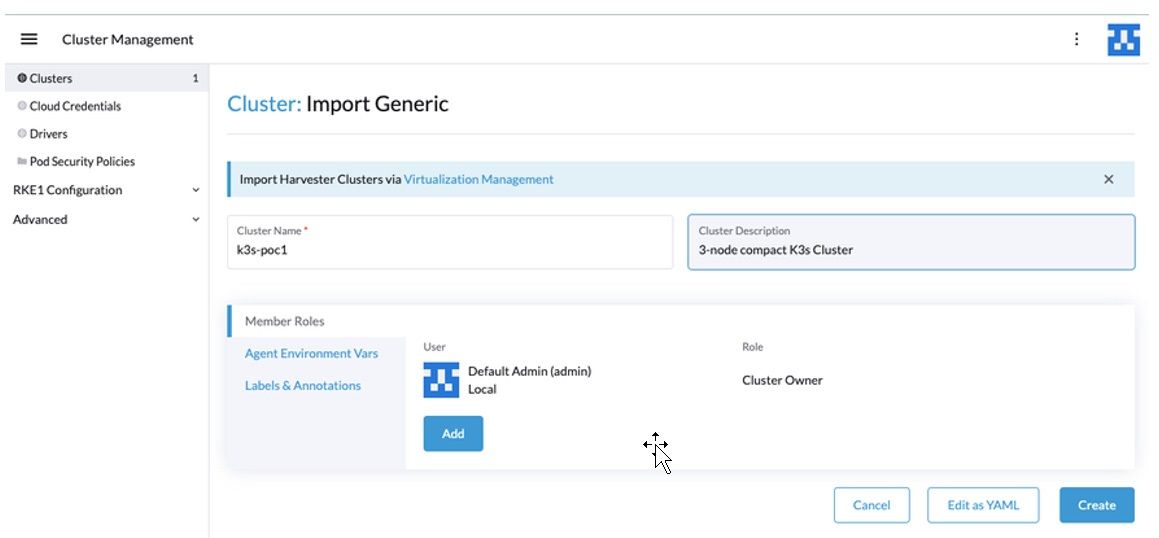 Figure 4: Import Generic Information
4. Refer to the following command to import k3s cluster to the Rancher:
$ curl --insecure -sfL https://10.76.85.165/v3/import/ xxxxx7wq6rrrpjft4gvzblksc9xzjchvl22xxxx_c-m-9xrzlsg4.yaml | kubectl apply -f - clusterrole.rbac.authorization.k8s.io/proxy-clusterrole-kubeapiserver created clusterrolebinding.rbac.authorization.k8s.io/proxy-role-binding-kubernetes-master created namespace/cattle-system created serviceaccount/cattle created clusterrolebinding.rbac.authorization.k8s.io/cattle-admin-binding created secret/cattle-credentials-b36fb99 created clusterrole.rbac.authorization.k8s.io/cattle-admin created Warning: spec.template.spec.affinity.nodeAffinity.requiredDuringSchedulingIgnoredDuringExecution.nodeSel ectorTerms[0].matchExpressions[0].key: beta.kubernetes.io/os is deprecated since v1.14; use "kubernetes.io/os" instead deployment.apps/cattle-cluster-agent created service/cattle-cluster-agent created
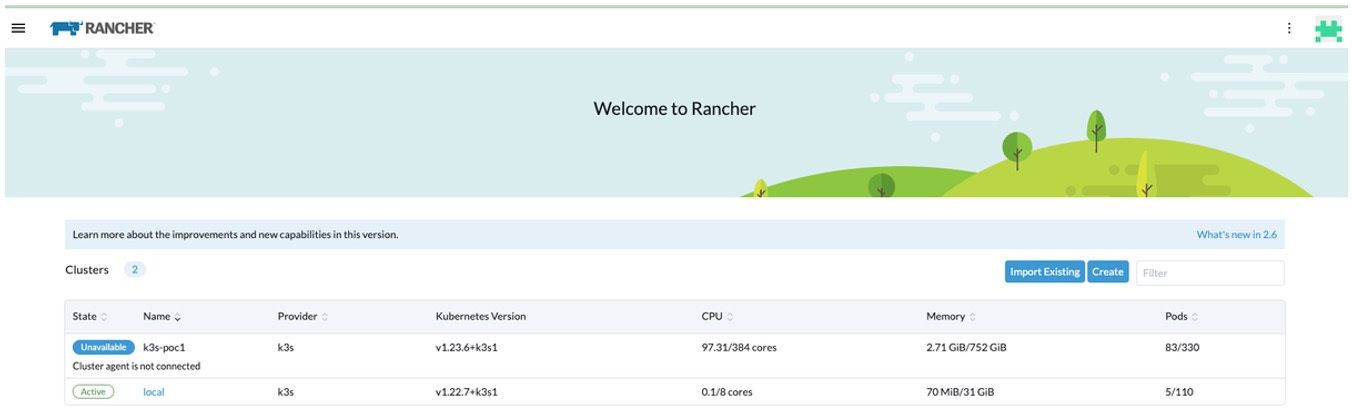
5. After a few minutes, the cluster appears on the dashboard.
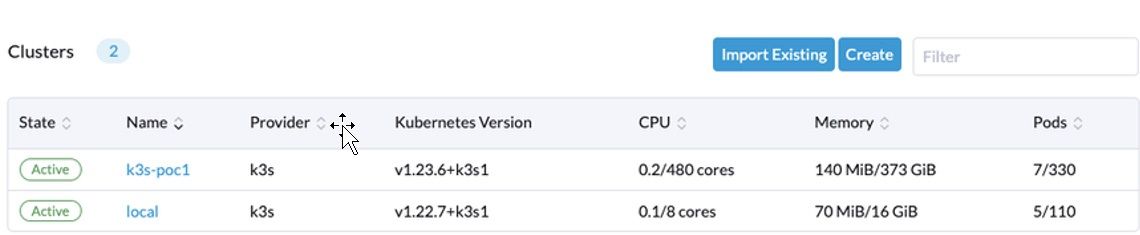 Figure 5: List of Clusters on the Dashboard
6. In the cluster view, there are 3 nodes with the Kubernetes version 1.23.6+k3s1.
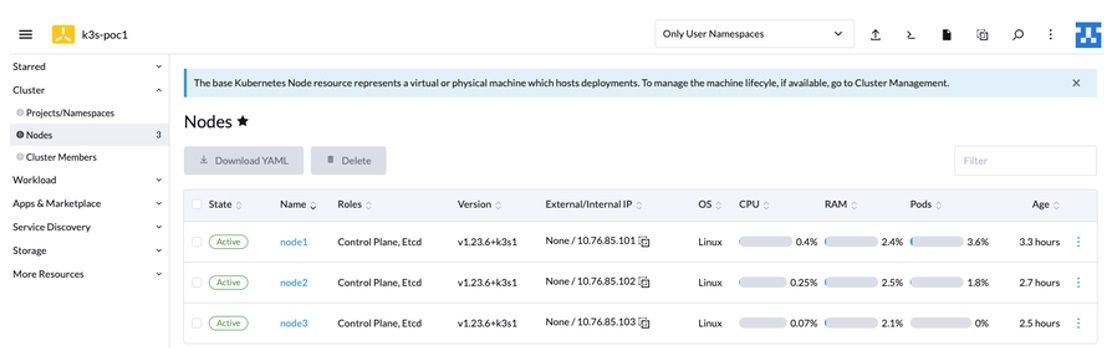 Figure 6: Nodes Page
Install Longhorn for Block Storage
1. For a clean deployment, clean up the target storage(s) for the Longhorn storage cluster using the following script with root permission. Note: You can add more storage devices in the loop if needed.
$ sudo su - $ for DISK in "/dev/nvme1n1" "/dev/nvme2n1" "/dev/nvme3n1" ; do echo $DISK && \ sgdisk --zap-all $DISK && \ dd if=/dev/zero of="$DISK" bs=1M count=100 oflag=direct,dsync && \ blkdiscard $DISK done
2. Make partitions on target storage(s) and format the partitions in xfs.
$ sudo fdisk /dev/nvme1n1 $ sudo fdisk /dev/nvme2n1 $ sudo mkfs.xfs /dev/nvme1n1p1 -f $ sudo mkfs.xfs /dev/nvme2n1p1 -f
3. Create mount points and edit /etc/fstab for the mount points.
$ sudo mkdir -p /var/lib/longhorn $ sudo mkdir -p /var/lib/longhorn2 $ sudo vi /etc/fstab ##add the line below /dev/nvme1n1p1 /var/lib/longhorn xfs defaults 0 1 /dev/nvme2n1p1 /var/lib/longhorn2 xfs defaults 0 1 ## save the file and quit vi editor
4. Mount the storage devices to the mount points.
$ sudo mount /var/lib/longhorn/ $ sudo mount /var/lib/longhorn2/
5. Click Longhorn from Apps & Marketplace > Charts to install Longhorn charts for block storage.
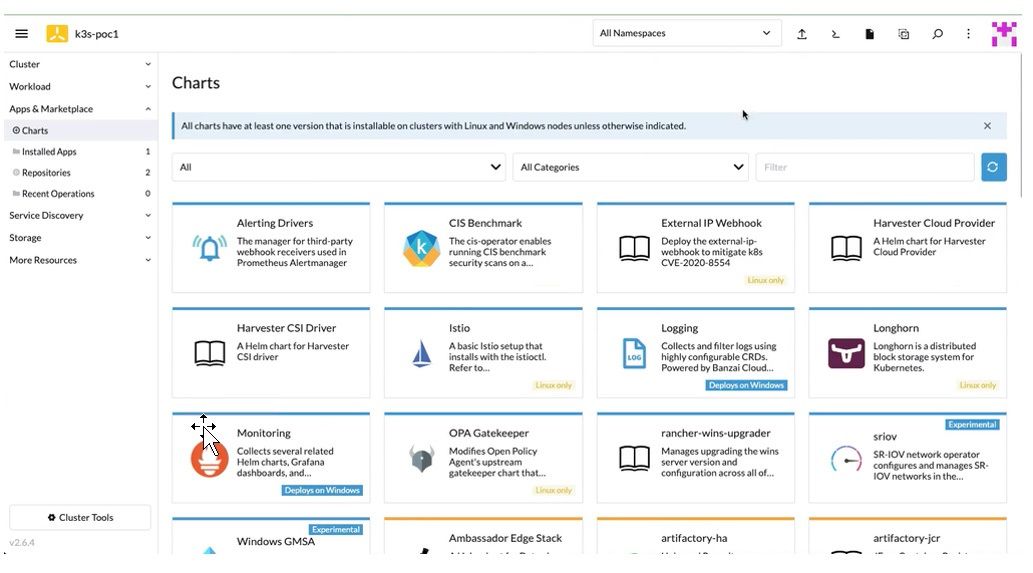 Figure 7: Charts Tab
6. For servers provisioned with SLE Micro;
- Ensure open-iscsi has been installed.
- iscsid daemon is running on all nodes of the Kubernetes cluster. If not, execute the following command to install:
$ sudo transactional-update pkg install open-iscsi ## after installation complete $ sudo reboot
7. Click Install to deploy the Longhorn charts.
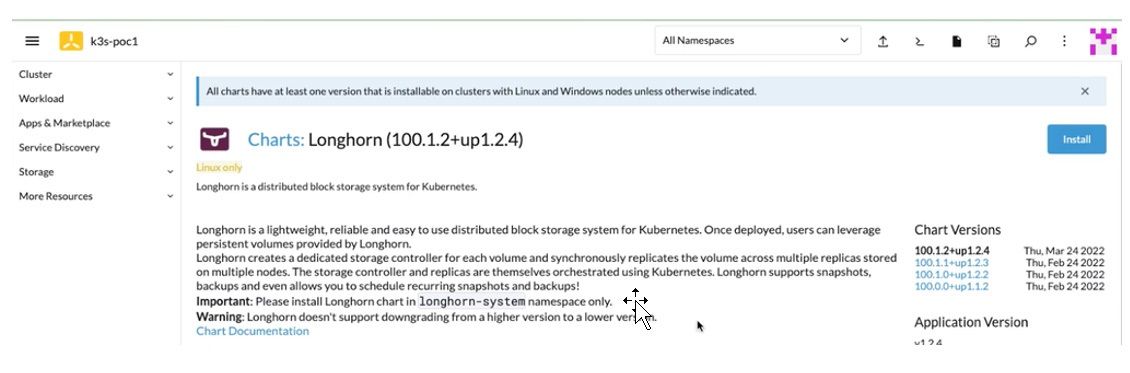 Figure 8: Longhorn Charts Deployment
8. After choosing the preferred customization on Step 2 page, click Install to complete the deployment. There will be a chart console showing up the deployment process on Rancher.
 Figure 9: Longhorn Charts Deployment: Step 2
9. Once the deployment is completed, the Longhorn page appears on the left-side navigation bar. Click Longhorn.
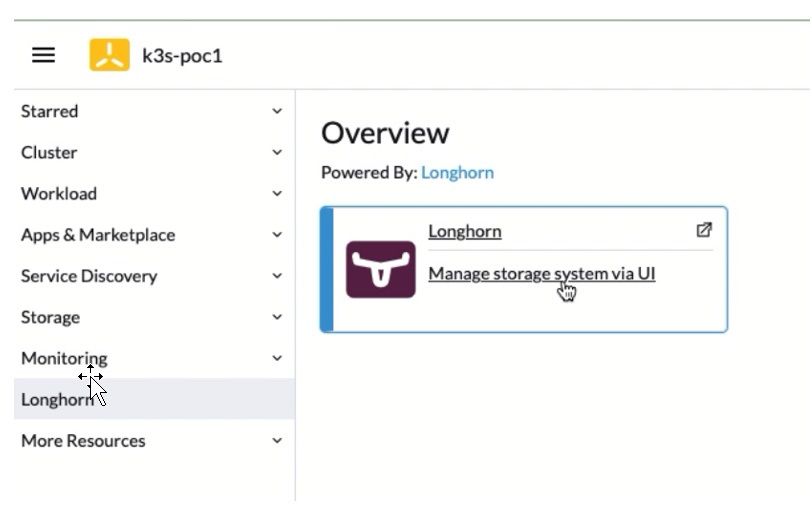 Figure 10: Longhorn Overview Page
10. The Longhorn storage console opens on another tab. Click Node for adding the drives to the Longhorn cluster.
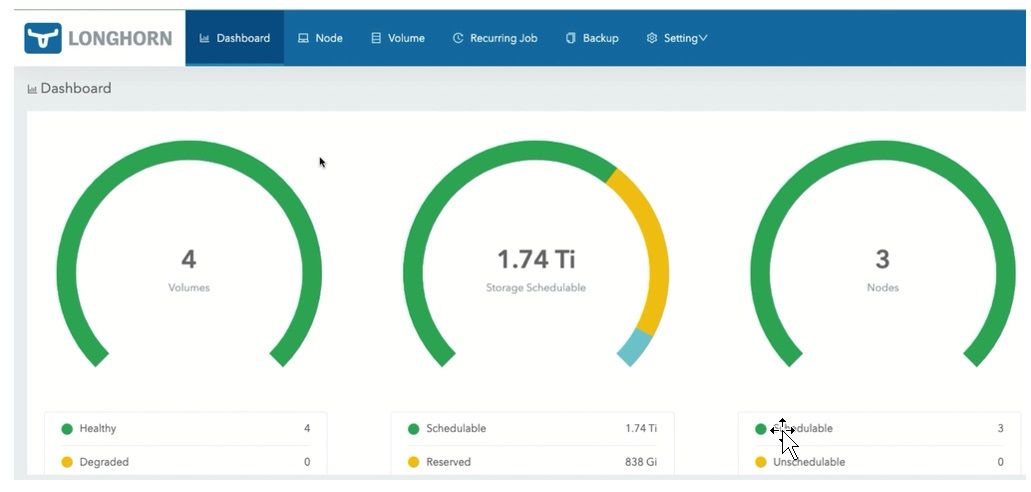 Figure 11: Dashboard Tab of the Longhorn Console
11. For node 1 from the Operation column drop-down, click Edit node and disks to add the second drive on each to the Longhorn cluster.
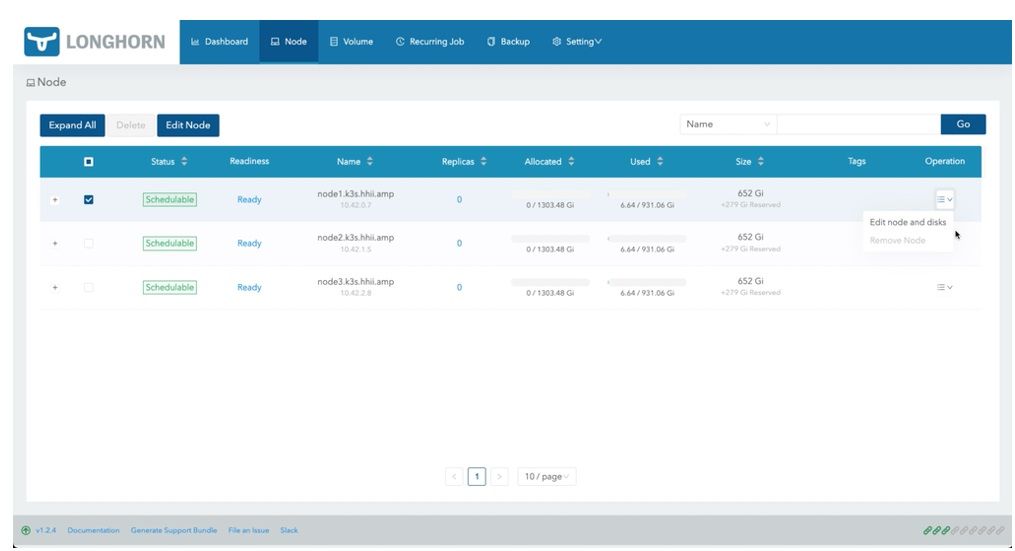 Figure 12: Node Tab of the Longhorn Console
12. A dialog window appears for the node.
- Click Add Disk.
- Enter the name of the disk. For example, node1-disk1.
- Enter the path (/var/lib/longhorn2/) for the new drive mounted.
- Select Enable under Scheduling to make the new drive functional in the cluster.
- Click Save.
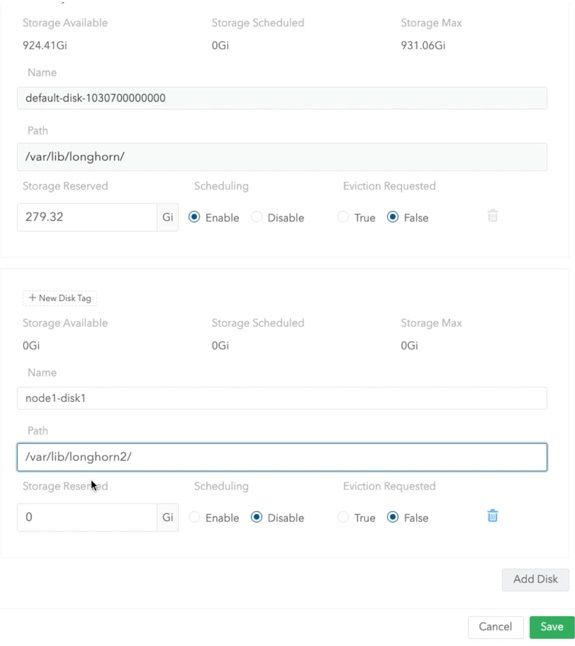 Figure 13: Dialog Window for the Node
13. Once it saves the new drive information, the Node tab displays the updated node's capacity.
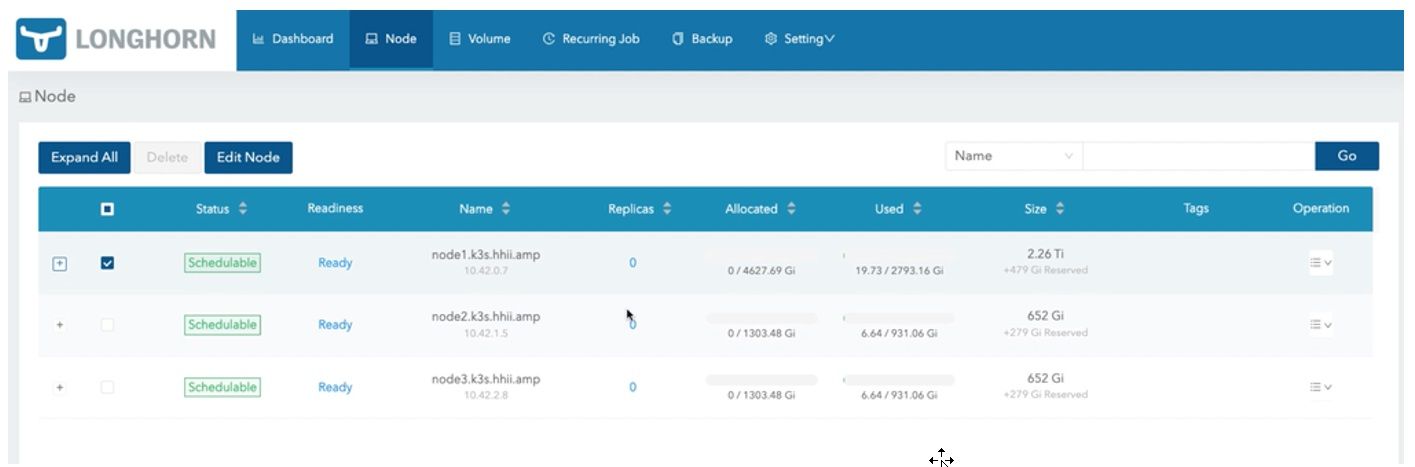 Figure 14: Node Tab of the Longhorn Console with the Updated Node’s Capacity
14. Repeat steps 11 - 13 for the other nodes.
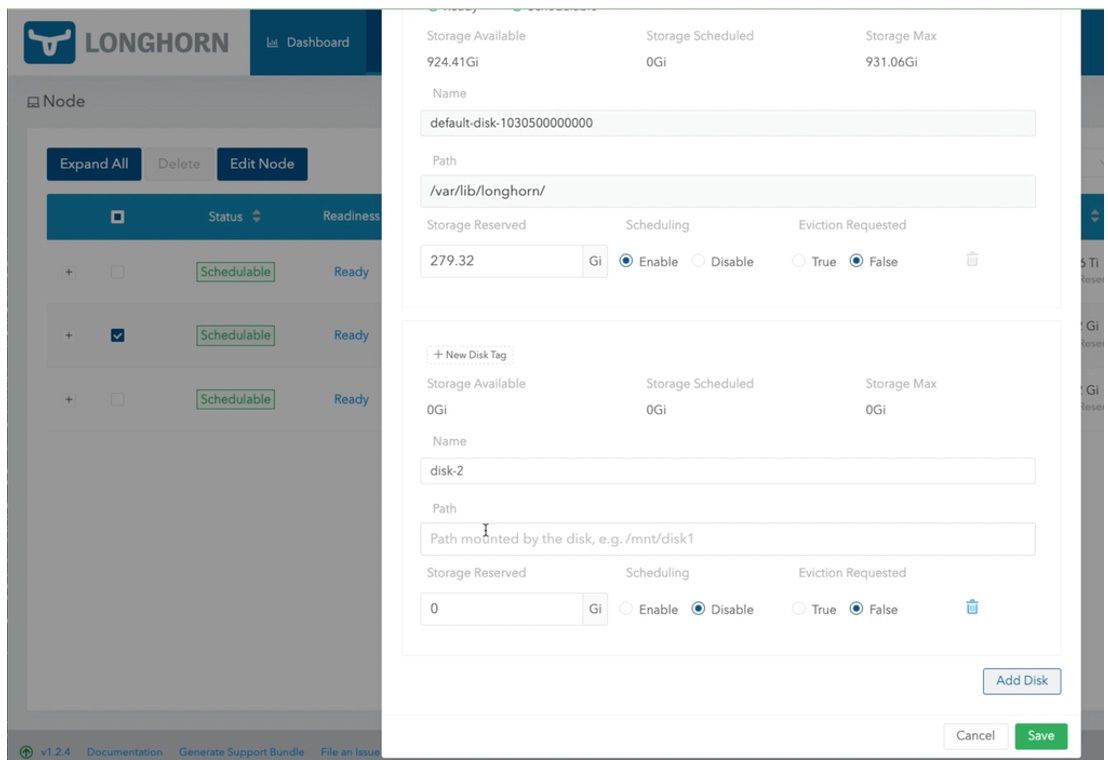 Figure 15: Dialog Window for Other Node
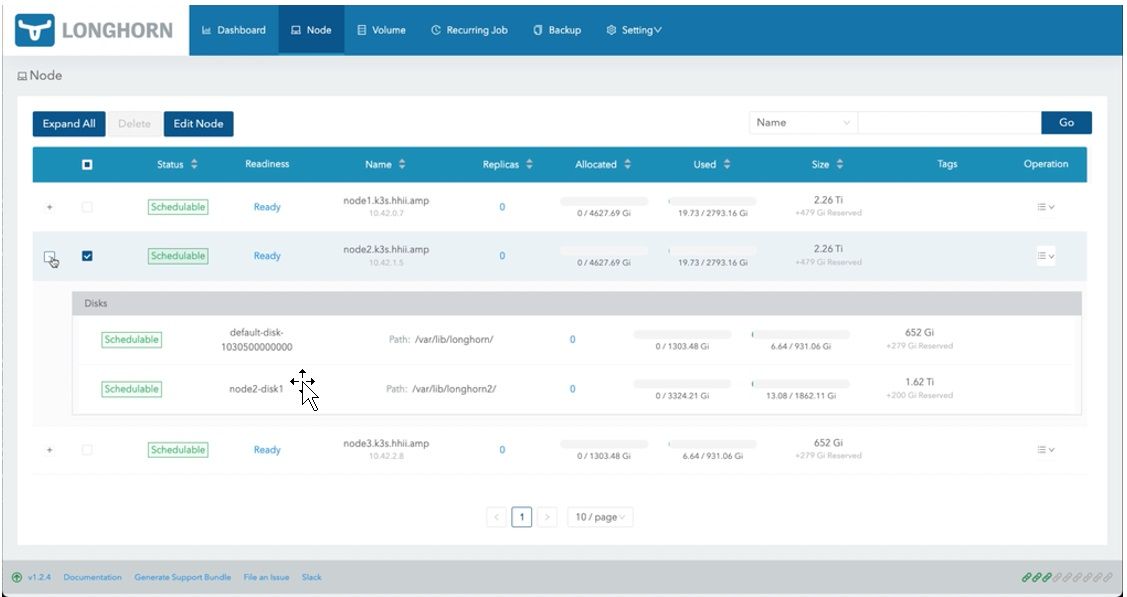 Figure 16: Node Tab of the Longhorn Console with the Updated Node’s Capacity
15. Once the new drives are added to the cluster, the Dashboard displays the total storage capacity to be scheduled in the Longhorn cluster.
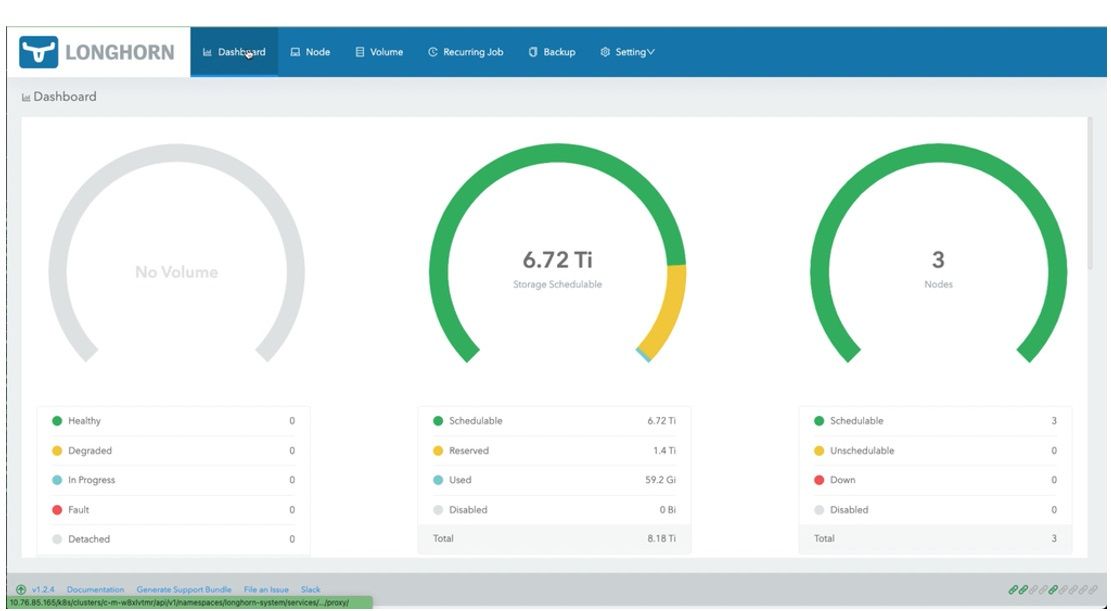 Figure 17: Dashboard Tab of the Longhorn Console with the Total Storage Capacity
16. If you add new drives for each node later, mount them on /var/lib/longhorn3 and repeat steps 11 - 13 to extend the storage capacity.
Install Prometheus and Grafana with PVC
Prerequisite: Ensure Longhorn service is up and running to enable persistent volumes for Prometheus and Grafana.
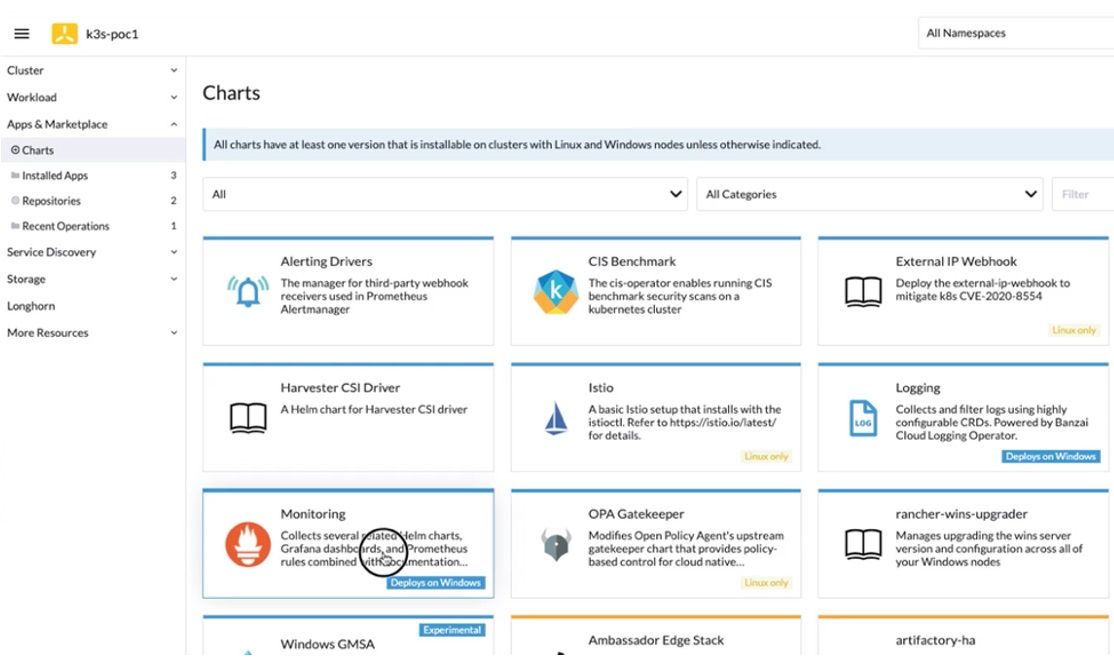
1. Click Monitoring from Apps & Marketplace > Charts to install Monitoring charts.
Figure 18: Charts Tab to Install Monitoring
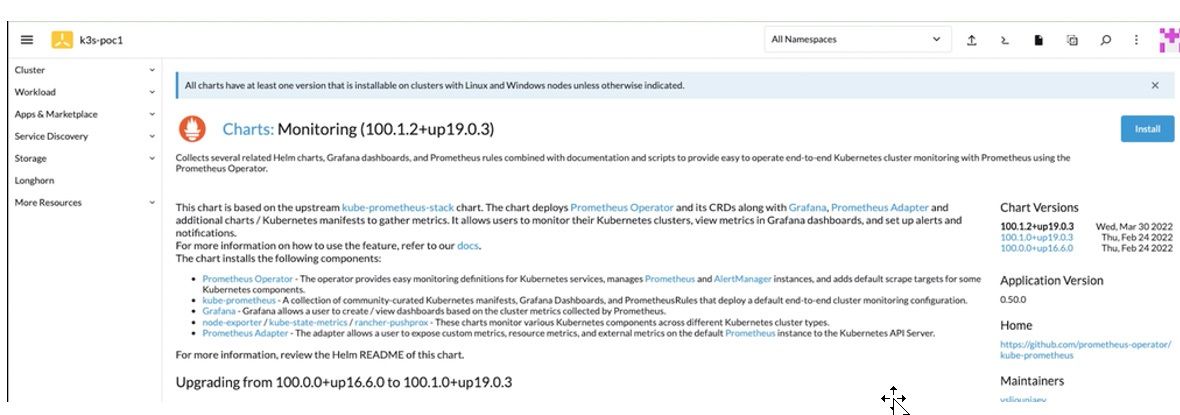
2. Click Install to deploy the Monitoring charts.
Figure 19: Monitoring Charts Deployment
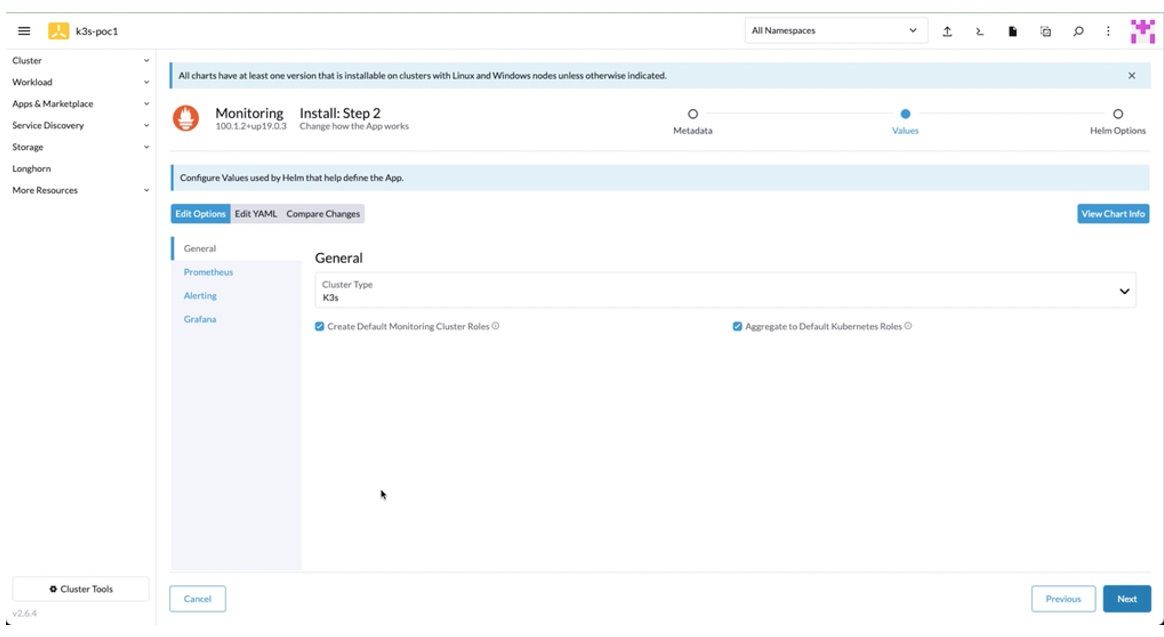
3. Under Edit Options tab enter the preferred customization on Step 2 page. Click Install to complete the deployment.
Figure 20: Monitoring Charts Deployment: Step 2
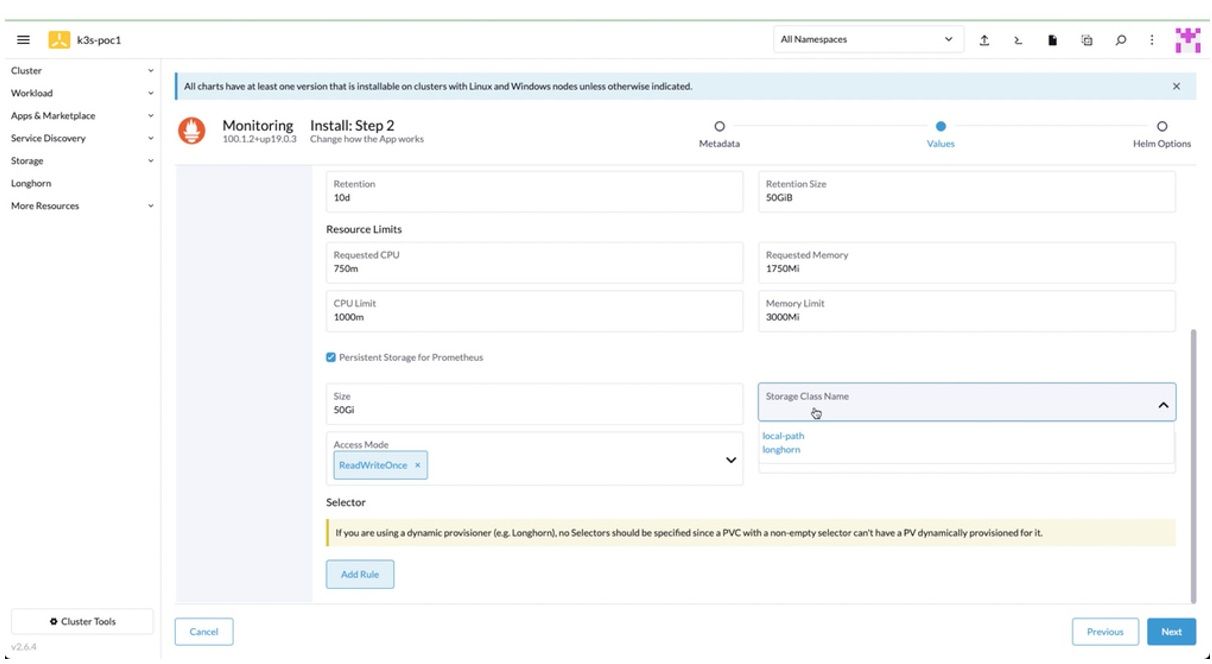
4. To configure Prometheus option,
- Check Persistent Storage for Prometheus.
- Choose longhorn from the Storage Class Name drop-down.
Figure 21: Prometheus Configuration
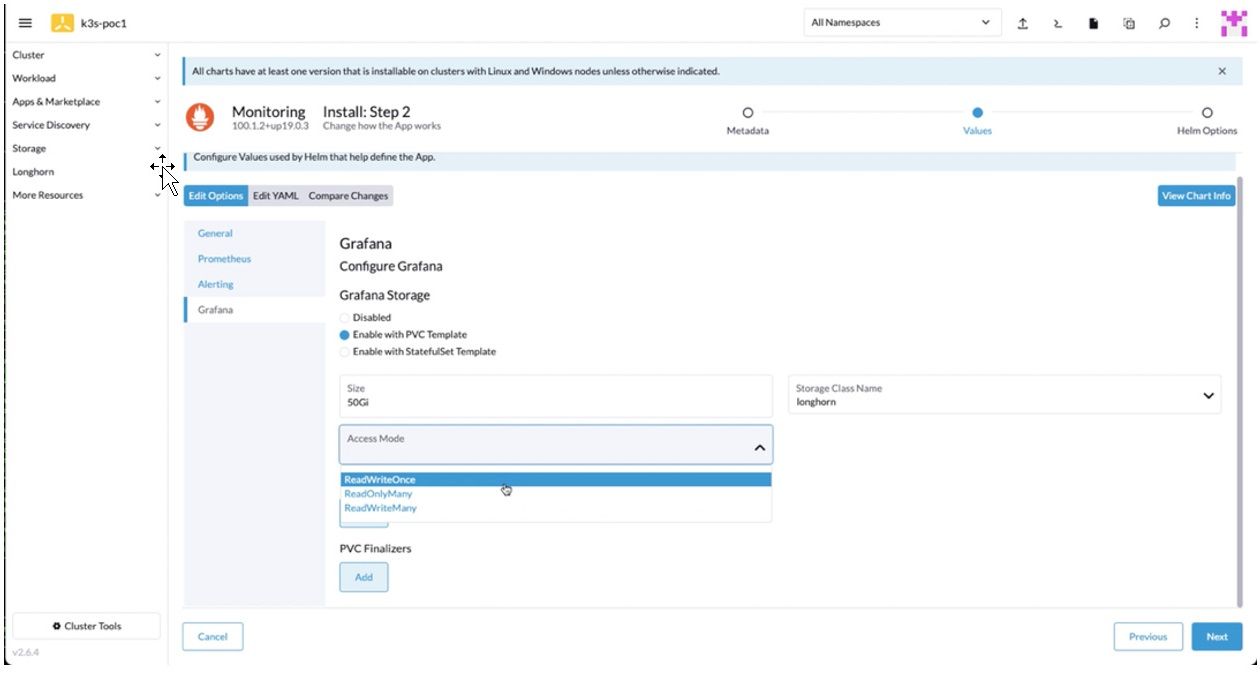
5. To configure Grafana option,
- Check Enable with PVC Template.
- Enter 50Gi as the Size field.
- Choose longhorn from the Storage Class Name drop-down.
- Choose ReadWriteOnce” from the Access Mode drop-down.
- Click Next to Step 3.
Figure 22: Grafana Configuration
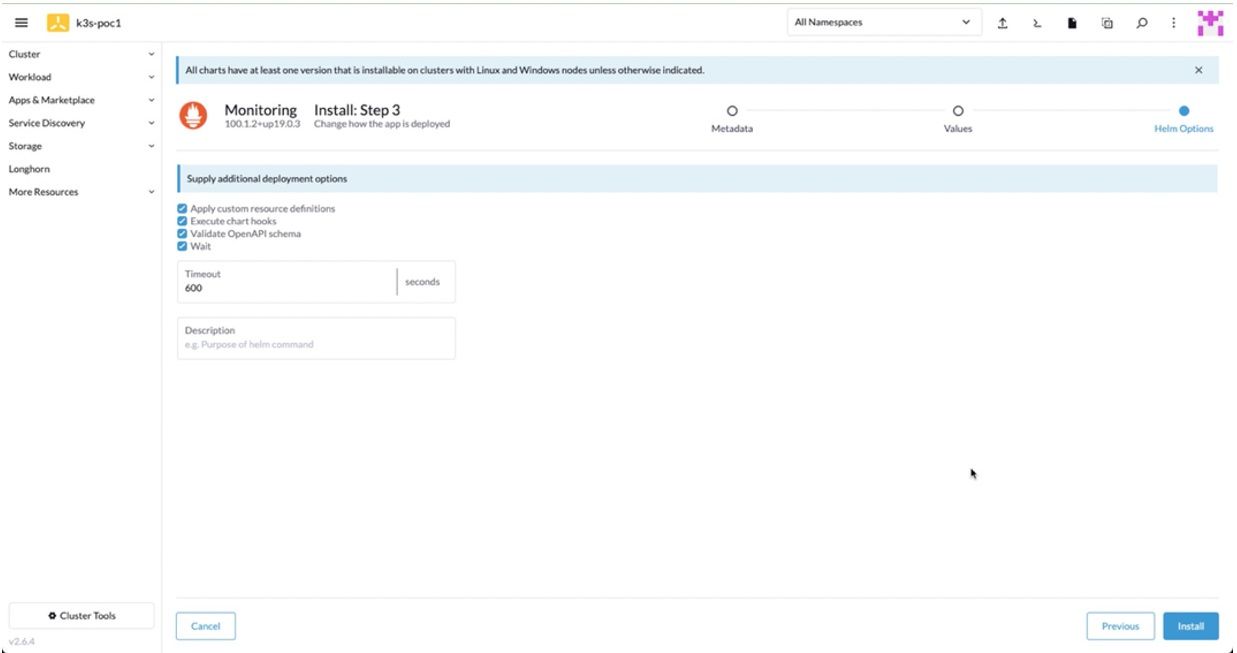
6. On Step 3, review the check boxes for additional deployment options and the timeout option. Click Install.
Figure 23: Additional Deployment Options
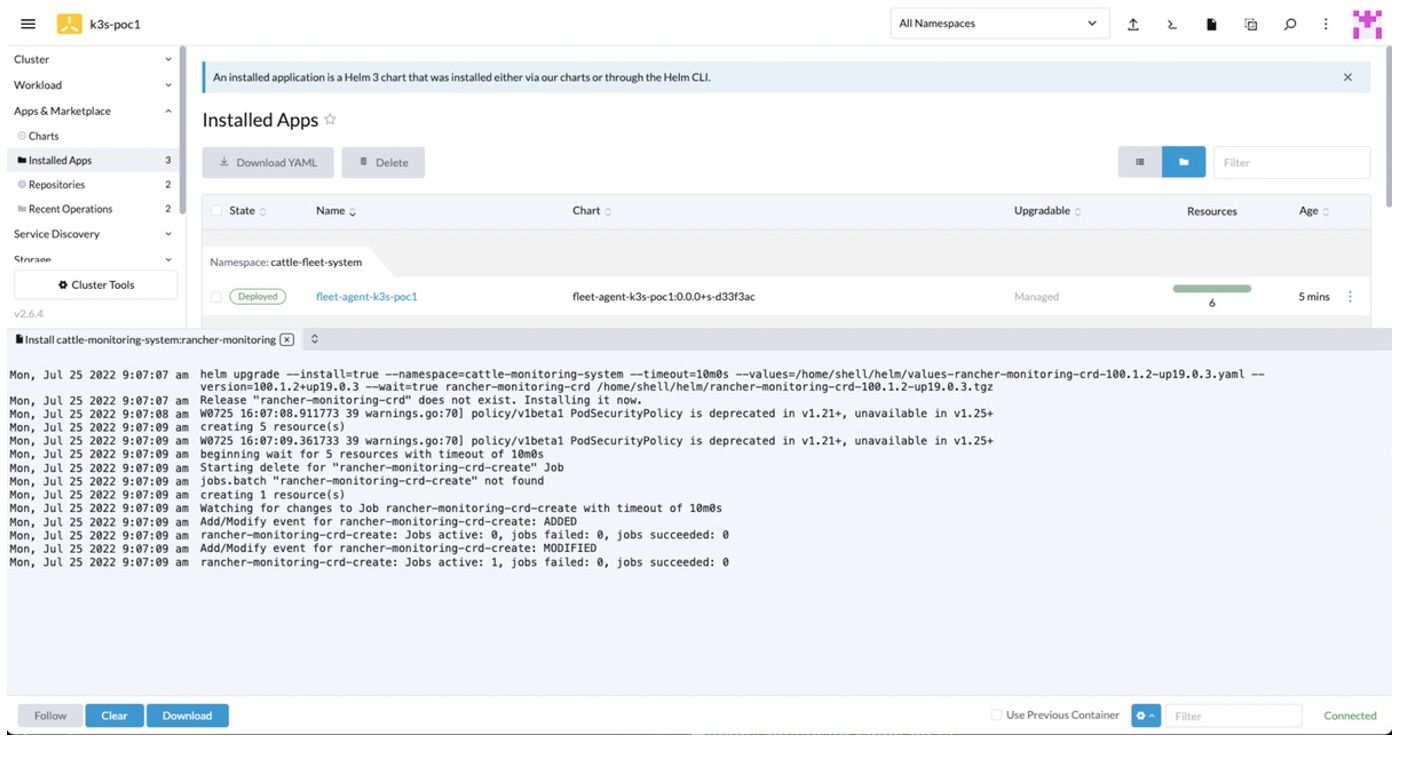
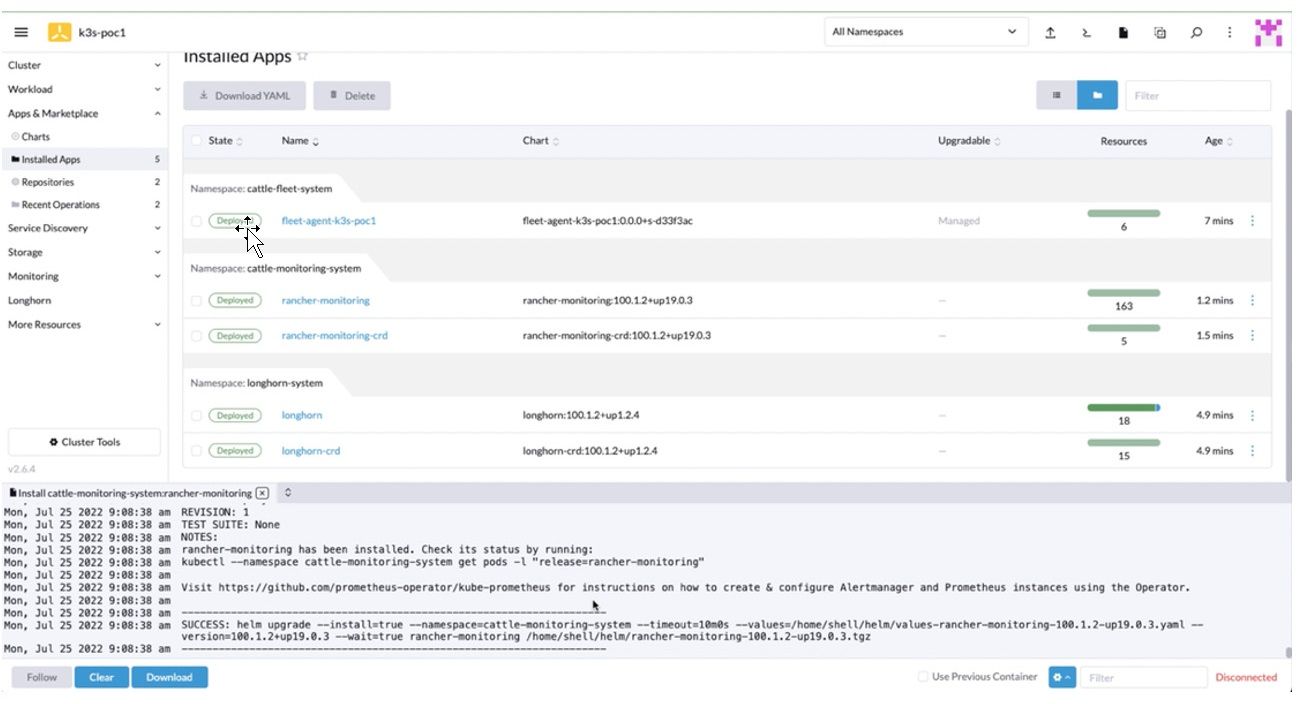
7. During installation, the Installed Apps page appears with the installation status.
Figure 24: Installed Apps Page with Installation Status
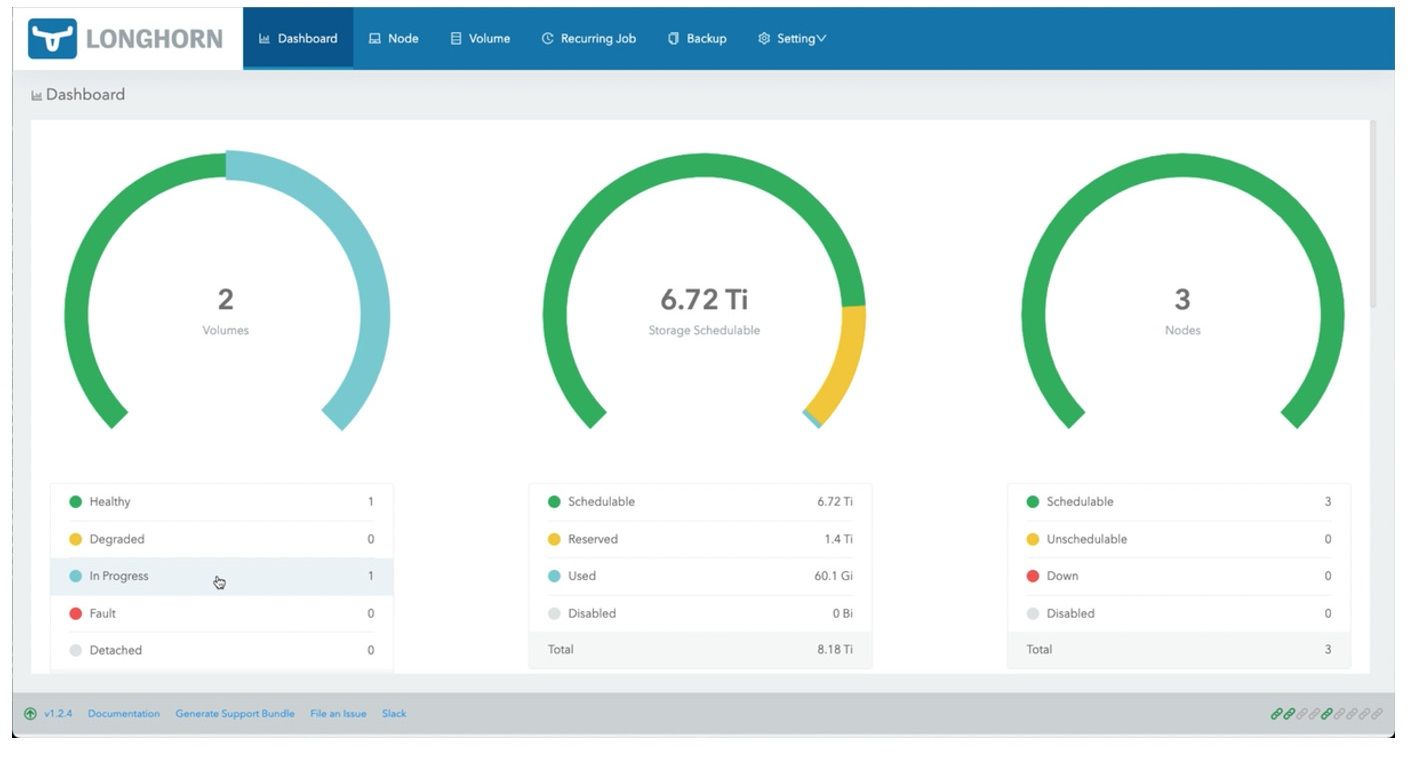
a. Check Longhorn Dashboard, you will see 2 volumes In Progress.
Figure 25: Longhorn Dashboard
8. When the installation is complete, a SUCCESS message appears on the Installed Apps page.
Figure 26: Installed Apps Page with the Success Message
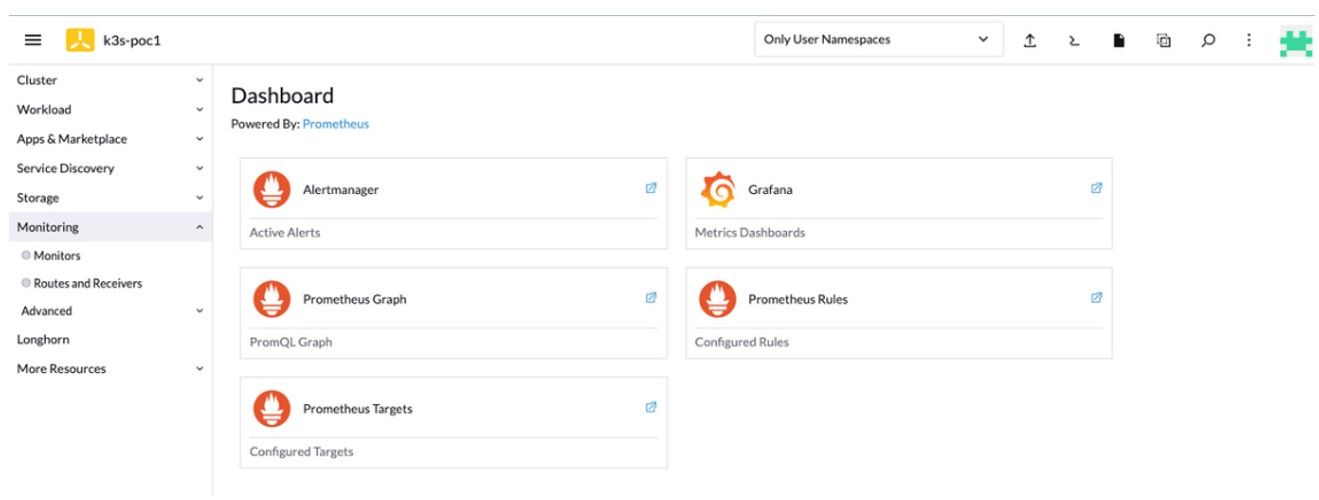
9. The Monitoring page appears on the left-side navigation bar. Click Monitoring to access the Dashboard.
Figure 27: Dashboard of Monitoring
10. Click Grafana.
11. The Grafana web application opens on a new tab of the browser.
Figure 28: Grafana Web Console

12. After a few minutes, the charts display the history of telemetries and utilizations.
Figure 29: Grafana Charts with Telemetries and Utilizations Data

Notes:
• If you want to re-install K3s on any node, clean up the node by uninstalling K3s and the drives for Longhorn storage service:
$ sudo su - $ /usr/local/bin/k3s-uninstall.sh $ umount /dev/nvme1n1 /dev/nvme2n1 /dev/nvme3n1 $ for DISK in "/dev/nvme1n1" "/dev/nvme2n1" "/dev/nvme3n1" ; do echo $DISK && \ sgdisk --zap-all $DISK && \ dd if=/dev/zero of="$DISK" bs=1M count=100 oflag=direct,dsync && \ blkdiscard $DISK done
• If you install K3s on SLE Micro v5.1 or later, reboot the system to complete the transaction update.
$ reboot
• The cluster is gracefully shutdown by the following steps:
a.Login to the nodes through SSH or cockpit web console.
b.For root privileges, execute the sudo command.
$ sudo su - #
c. Shutdown K3s on each node.
# k3s-killall.sh
d. Wait for the script to complete its jobs.
e. Shutdown the nodes by entering:
# poweroff
or
# shutdown -h now
The rancher console displays the state of the cluster is Unavailable.
Figure 30: Rancher Console
Revision History
| ISSUE | DATE | DESCRIPTION |
|---|---|---|
| 1.00 | November 7, 2022 | Initial release. |
Disclaimer
November 7, 2022 Ampere Computing reserves the right to change or discontinue this product without notice. While the information contained herein is believed to be accurate, such information is preliminary, and should not be relied upon for accuracy or completeness, and no representations or warranties of accuracy or completeness are made. The information contained in this document is subject to change or withdrawal at any time without notice and is being provided on an “AS IS” basis without warranty or indemnity of any kind, whether express or implied, including without limitation, the implied warranties of non-infringement, merchantability, or fitness for a particular purpose. Any products, services, or programs discussed in this document are sold or licensed under Ampere Computing’s standard terms and conditions, copies of which may be obtained from your local Ampere Computing representative. Nothing in this document shall operate as an express or implied license or indemnity under the intellectual property rights of Ampere Computing or third parties. Without limiting the generality of the foregoing, any performance data contained in this document was determined in a specific or controlled environment and not submitted to any formal Ampere Computing test. Therefore, the results obtained in other operating environments may vary significantly. Under no circumstances will Ampere Computing be liable for any damages whatsoever arising out of or resulting from any use of the document or the information contained herein.
Ampere Computing reserves the right to make changes to its products, its datasheets, or related documentation, without notice and warrants its products solely pursuant to its terms and conditions of sale, only to substantially comply with the latest available datasheet. Ampere, Ampere Computing, the Ampere Computing and ‘A’ logos, and Altra are registered trademarks of Ampere Computing. Arm is a registered trademark of Arm Limited (or its subsidiaries) in the US and/or elsewhere. All other trademarks are the property of their respective holders. Copyright © 2022 Ampere Computing. All rights reserved.
Related Content
Ampere Computing LLC
4655 Great America Parkway Suite 601
Santa Clara, CA 95054


