
Deploying VoD on Oracle Container Engine for Kubernetes
On Ampere A1 Instances
Overview
Ampere is pleased to showcase open-source Video-on-Demand services using Kubernetes, to exhibit the cloud native characteristics of the Ampere A1 instance on OCI for video services:
-
OKE - Oracle Container Engine for Kubernetes as certified Kubernetes distribution with add-on functions and services.
- Choose 3 worker nodes in a cluster as the minimum requirement for high availability (HA).
- OCI Block Volume Service - a Block Storage, which is the key element for keeping metadata, videos (mp4, mov, or avi), and subtitles (e.g., WebVTT, etc.) to generate playlists & segment files for VOD services.
- OCI Load Balancer - An OSI layer 4 (TCP) and layer 7 (HTTP) proxy, which supports features such as SSL termination and advanced HTTP routing policies. It provides the utmost flexibility, with responsive scaling up and down. You choose a custom minimum bandwidth and an optional maximum bandwidth, both between 10 Mbps and 8,000 Mbps.
-
OCI Object Storage Service - An internet-scale, high performance storage platform which offers reliable and cost-efficient data durability. It provides the following resources:
- Buckets - The logical containers for storing objects in compartments within an Object Storage namespace. A bucket is associated with a single compartment and polices that indicate what actions the users can perform on a bucket and all objects inside.
- Objects - Any type of data, regardless of content types, is stored as an object. Each object is stored in a bucket.
- Pre-Authenticated Requests - Provide a way to let users access a bucket or an object without having their own credentials. Users continue to have access to the bucket or object as long as the creator of the request has permission to access them. When you create pre-authenticated request (PAR), a unique URL is generated. Anyone who has the URL can access the Object Storage resources identified in the PAR, with the standard HTTP tools like curl and wget.
- Oracle DNS Management - A distributed internet system that maps human-readable names to IP addresses.
-
Pods:
- nginx-vod-module-container - An NGINX based container with VOD module as the backend for streaming video
- nginx-hello-container - An NGINX Webserver container as the YouTube-like front-end HTML pages
Prerequisites
-
Create an OKE cluster with 3 Ampere A1 instances as worker nodes by following the instructions via the link below:
-
The OCI cli and kubectl executable files on your laptop or workstation
- OCI CLI
## macOS $ brew update && brew install oci-cli. ## Unix / Linux $ bash -c "$(curl -L https://raw.githubusercontent.com/oracle/oci-cli/master/scripts/install/install.sh)"
- kubectl version 1.23.x or later (https://kubernetes.io/docs/tasks/tools/)
# For Linux user (Arm64 or x86-64) $ curl -LO "https://dl.k8s.io/release/v1.23.6/bin/linux/arm64/kubectl" or $ curl -LO "https://dl.k8s.io/release/v1.23.6/bin/linux/amd64/kubectl" # For windows user $ curl -LO "https://dl.k8s.io/release/v1.23.6/bin/windows/amd64/kubectl.exe" # For Mac user (x86 or Apple Silicon) $ curl -LO "https://dl.k8s.io/release/v1.23.6/bin/darwin/amd64/kubectl" or $ curl -LO "https://dl.k8s.io/release/v1.23.6/bin/darwin/arm64/kubectl" ## Make the kubectl binary executable $ chmod +x kubectl ## Move the kubectl binary to a file location on your system PATH $ sudo mv ./kubectl /usr/local/bin/kubectl $ sudo chown root: /usr/local/bin/kubectl ## Verify the binary to ensure the version you installed is 1.23.6 $ kubectl version --client
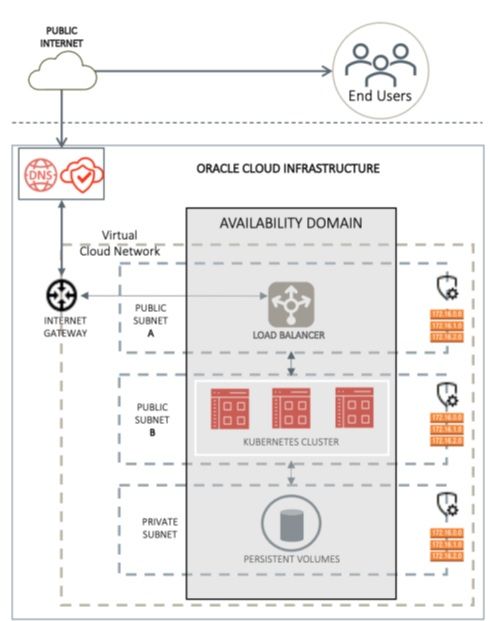 Figure A-1: Network Overview of OCI OKE on Ampere A1 instances
Instructions
The following are the step-by-step instructions to deploy Video on Demand PoC demo on OCI OKE cluster:
1. Login to OCI with oci-cli
$ oci session authenticate
2. Login to Oracle Cloud Infrastructure on the browser, then click “OKE Containers → Clusters → Cluster details → Access Cluster.” This will show the full command to get kubeconfig
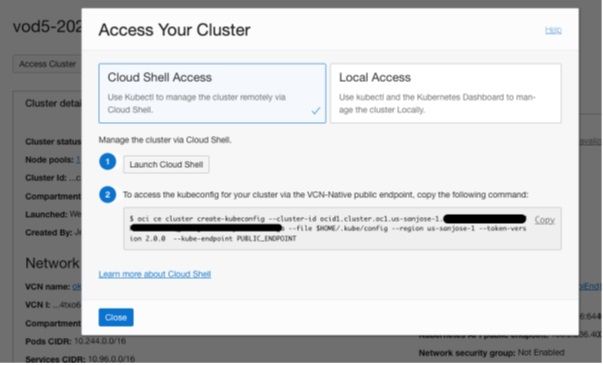 Figure A-2
3. Obtain kubeconfig with oci-cli
$ oci ce cluster create-kubeconfig --cluster-id \ ocid1.cluster.oc1.us-sanjose-1.[token] \ --file $HOME/.kube/config --region us-sanjose-1 --token-version 2.0.0 \ --kube-endpoint PUBLIC_ENDPOINT
4. Save the file as “config” under .kube in your home directory and run “kubectl get nodes” for a quick test
$ kubectl get nodes NAME STATUS ROLES AGE VERSION 10\. 0.10.179 Ready node 68d v1.23.4 10\. 0.10.250 Ready node 68d v1.23.4 10\. 0.10.88 Ready node 68d v1.23.4
5. Obtain the source code from the GitHub repositories:
- https://github.com/AmpereComputing/nginx-hello-container
- https://github.com/AmpereComputing/nginx-vod-module-container
$ git clone https://github.com/AmpereComputing/nginx-hello-container $ git clone https://github.com/AmpereComputing/nginx-vod-module-container
6. Deploy NGINX web server container in StatefulSet with PVC template, service, and ingress
$ kubectl -n vod-poc create -f nginx-hello/OCI-OKE/nginx-front-app.yaml
7. Deploy NGINX VOD container in StatefulSet with PVC template, service, and ingress
$ kubectl -n vod-poc create -f nginx-vod-module-container/OCI-OKE/nginx-vod-app.yaml
8. Get the deployment status
$ kubectl get pvc -n vod-poc NAME STATUS VOLUME CAPACITY ACCESS MODES STORAGECLASS AGE nginx-front-app-pvc-nginx-front-app-0 Bound csi-8c3c066a-3adc-48dd-8ea1-a1f3c8a2b088 100Gi RWO oci-bv 1m nginx-front-app-pvc-nginx-front-app-1 Bound csi-s9b2422b-6878-4a78-a20a-40be31b1b7f0 100Gi RWO oci-bv 1m nginx-front-app-pvc-nginx-front-app-2 Bound csi-t4b77b08-ae81-4342-8bb4-ef14d37190c7 100Gi RWO oci-bv 1m nginx-vod-app-pvc-nginx-vod-app-0 Bound csi-4912eea5-da94-471e-b720-4d0f724cdaaa 100Gi RWO oci-bv 1m nginx-vod-app-pvc-nginx-vod-app-1 Bound csi-37c6d642-3502-414f-b37e-fb393a0db051 100Gi RWO oci-bv 1m nginx-vod-app-pvc-nginx-vod-app-2 Bound csi-29fac236-59a1-44d2-a395-83d515915196 100Gi RWO oci-bv 1m $ kubectl get statefulset -n vod-poc NAME READY AGE nginx-front-app 3/3 1m nginx-vod-app 3/3 1m $ kubectl get pod -n vod-poc NAME READY STATUS RESTARTS AGE nginx-front-app-0 1/1 Running 0 1m nginx-front-app-1 1/1 Running 0 30s nginx-front-app-2 1/1 Running 0 10s nginx-vod-app-0 1/1 Running 0 1m nginx-vod-app-1 1/1 Running 0 30s nginx-vod-app-2 1/1 Running 0 10s $ kubectl get service -n vod-poc NAME TYPE CLUSTER-IP EXTERNAL-IP PORT(S) AGE nginx-front-app-svc LoadBalancer 10.96.165.77 192.9.146.135 80:32538/TCP 1m nginx-vod-app-svc LoadBalancer 10.96.106.50 192.18.139.9 80:30401/TCP 1m
9. Get the external IP addresses for the load balancers of nginx-vod-app-svc and nginx-front-app-svc
$ kubectl get service | grep -i vod-app | awk '{print $4}' 192\. 18.139.9 $ kubectl get service | grep -i front-app | Name Record Type TTL IP Address demo.oke.amperedemo.site A 10 minutes 192.9.146.135 vod.oke.amperedemo.site A 10 minutes 192.18.139.9awk '{print $4}' 192\. 9.146.135
10. Under “Oracle main page → Networking → DNS Management” click “Create Zone” for oke.amperedemo.site
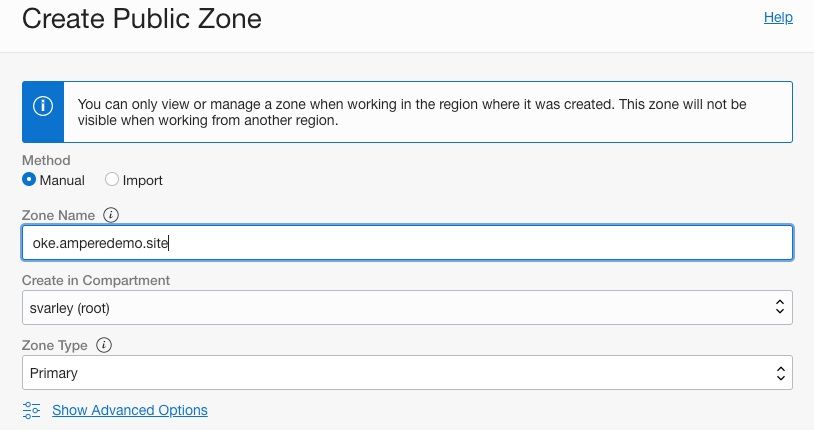 Figure A-3
a.This demo needs 2 DNS A records under oke.amperedemo.site zone
Name Record Type TTL IP Address demo.oke.amperedemo.site A 10 minutes 192.9.146.135 vod.oke.amperedemo.site A 10 minutes 192.18.139.9
b.Once the zone is active, click “Records” tab on the resources section, and click “Add Record” for adding A record, then select “A - IPv4 Address” on Record Type and fill in the information above
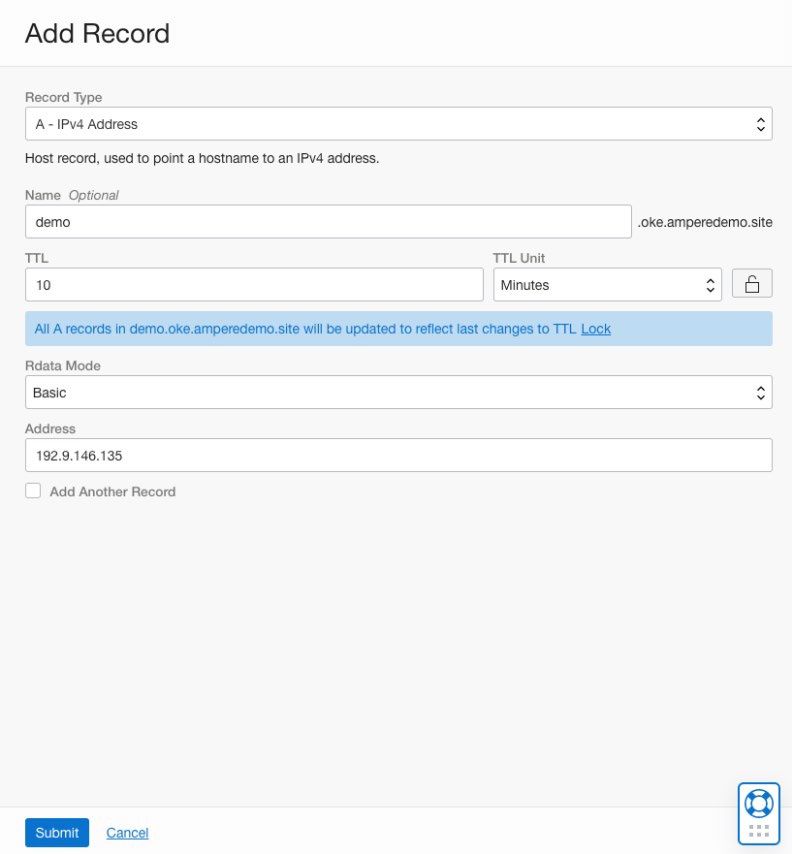 Figure A-4
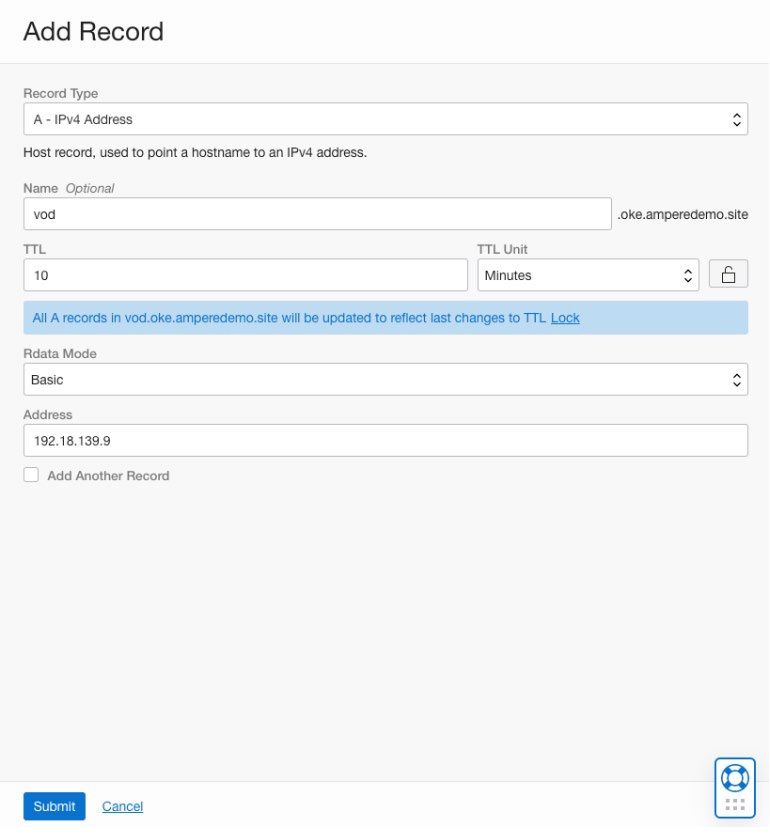 Figure A-5
c.Wait for 10 minutes, then verify the DNS records by dig with the name server 1.1.1.1
$ dig demo.oke.amperedemo.site @1.1.1.1 ; <<>> DiG 9.10.6 <<>> demo.oke.amperedemo.site @1.1.1.1 ;; global options: +cmd ;; Got answer: ;; ->>HEADER<<- opcode: QUERY, status: NOERROR, id: 19533 ;; flags: qr rd ra ad; QUERY: 1, ANSWER: 1, AUTHORITY: 0, ADDITIONAL: 1 ;; OPT PSEUDOSECTION: ; EDNS: version: 0, flags:; udp: 1232 ;; QUESTION SECTION: ;demo.oke.amperedemo.site. IN A ;; ANSWER SECTION: demo.oke.amperedemo.site. 600 IN A 192.9.146.135 ;; Query time: 202 msec ;; SERVER: 1.1.1.1#53(1.1.1.1) ;; WHEN: Thu Oct 06 16:28:37 PDT 2022 ;; MSG SIZE rcvd: 69 $ dig vod.oke.amperedemo.site @1.1.1.1 ; <<>> DiG 9.10.6 <<>> vod.oke.amperedemo.site @1.1.1.1 ;; global options: +cmd ;; Got answer: ;; ->>HEADER<<- opcode: QUERY, status: NOERROR, id: 14636 ;; flags: qr rd ra ad; QUERY: 1, ANSWER: 1, AUTHORITY: 0, ADDITIONAL: 1 ;; OPT PSEUDOSECTION: ; EDNS: version: 0, flags:; udp: 1232 ;; QUESTION SECTION: ;vod.oke.amperedemo.site. IN A ;; ANSWER SECTION: vod.oke.amperedemo.site. 600 IN A 192.18.139.9 ;; Query time: 164 msec ;; SERVER: 1.1.1.1#53(1.1.1.1) ;; WHEN: Thu Oct 06 16:29:15 PDT 2022 ;; MSG SIZE rcvd: 68
11. Afterwards, we need to apply the deployment bundle to each PoC demo pod on OKE.
a.Under “Oracle main page → storage → buckets” click “Create Bucket” button to create a new bucket for the VOD bundle files
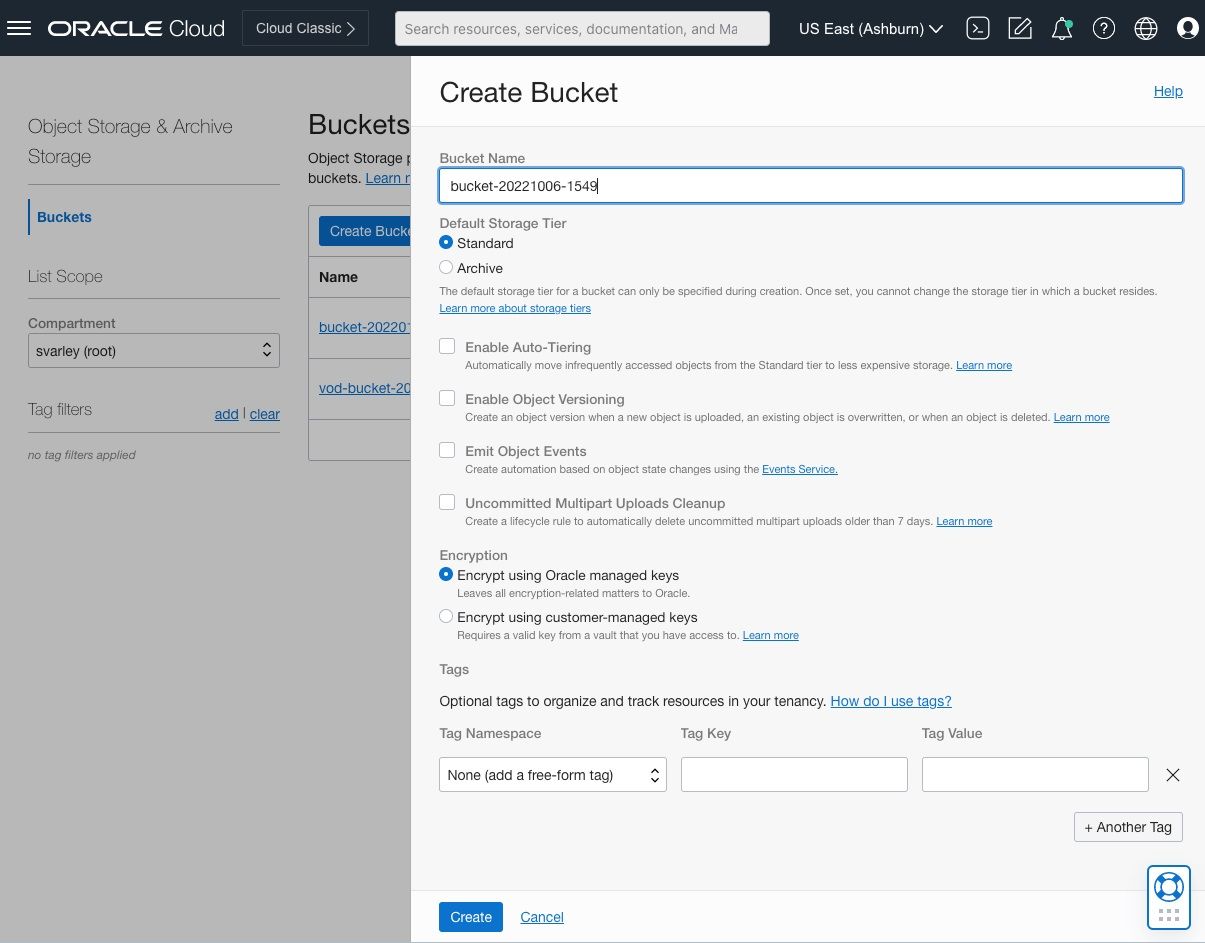 Figure A-6
b.Once the bucket is created, click the link of the name of the newly created bucket
c.Then click “Objects” tab on the “Resources” section on the left side, and click the “Upload” button to upload the bundle files to the bucket on OCI Object storage
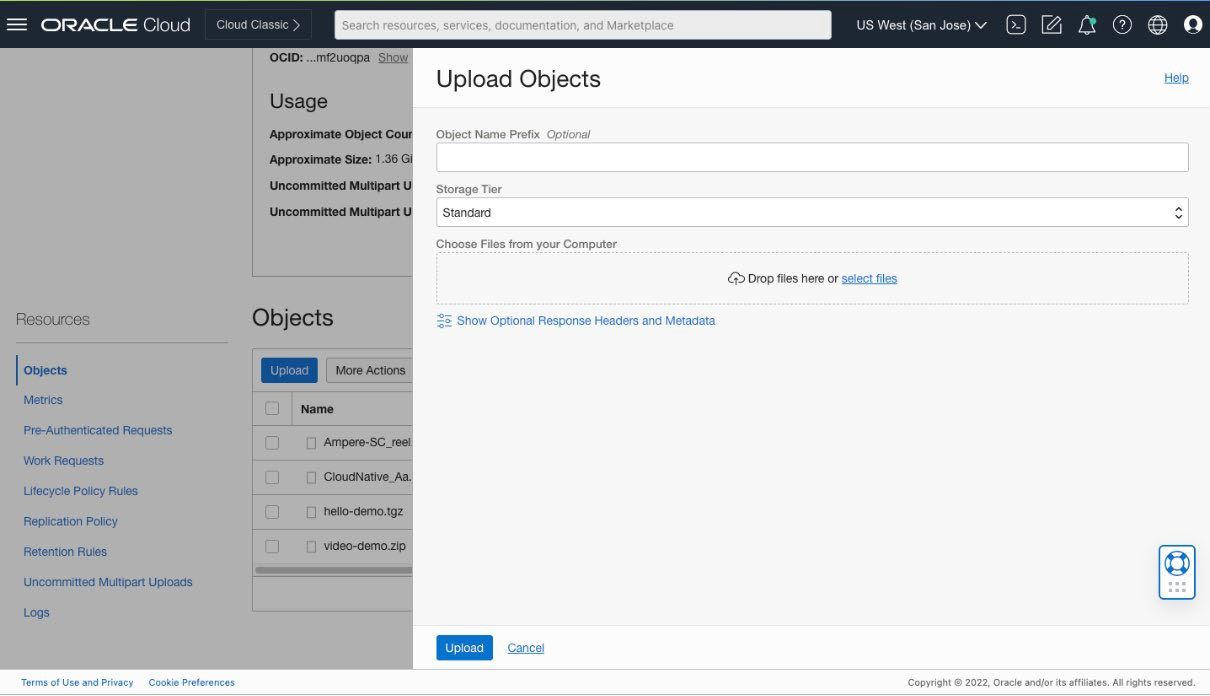 Figure A-7
d.Once the files are uploaded, make a Pre-Authenticated Request (PAR) by clicking “Pre-Authenticated Requests" under “Resources” then click the button “Create Pre-Authenticated Request”
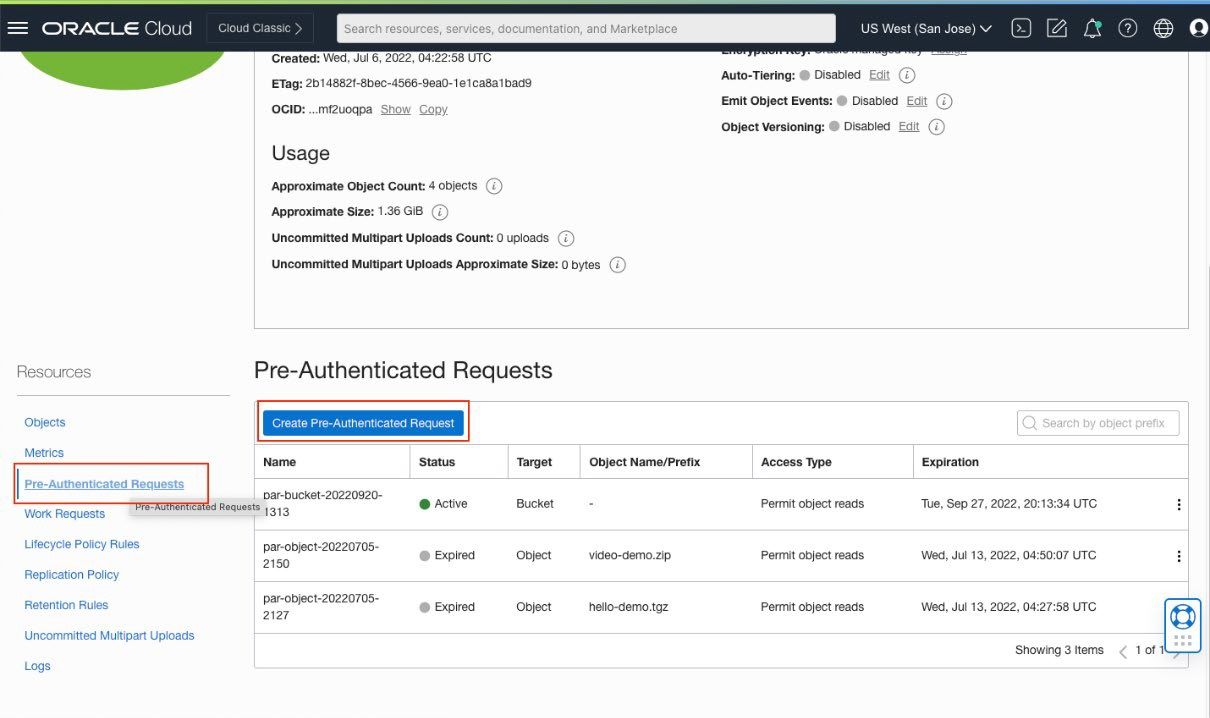 Figure A-8
e.Choose “Permit object reads” and “Enable Object Listing” then click the button of “Create Pre-Authenticated Request” to generate a new PAR for you accessing the bucket
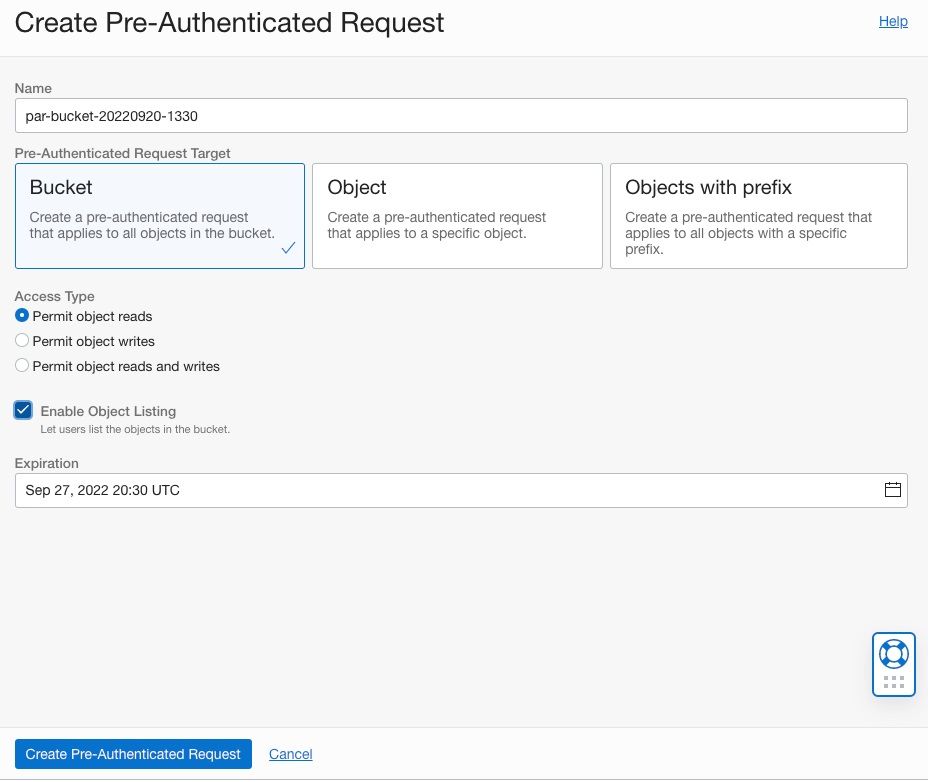 Figure A-9
f.It will pop up a dialog for the details of Pre-Authenticated Request (PAR) URL. Copy the PAR URL (like https://objectstorage.us-[region]-1.oraclecloud.com/p/[token1]/n/[token2]/b/[bucket_name]/o/)for the next step
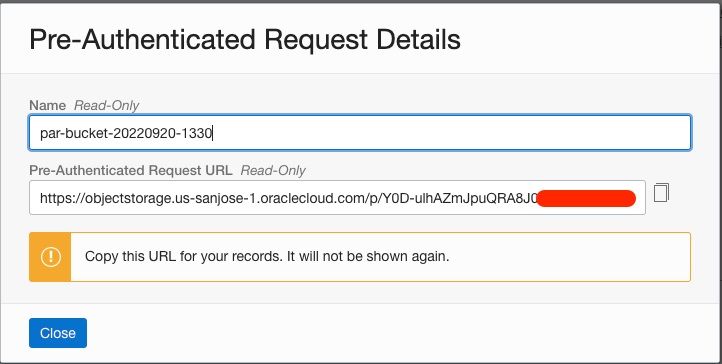 Figure A-10
g.Use the command below to test the PAR URL (like https://objectstorage.us-[region]-1.oraclecloud.com/p/[token1]/n/[token2]/b/[bucket_name]/o/) from step 11.f on your laptop or workstation
/ # cd /usr/share/nginx/html/ /usr/share/nginx/html # wget [the PAR link]nginx-front-demo.tgz /usr/share/nginx/html # tar zxvf nginx-front-demo.tgz /usr/share/nginx/html # mv nginx-front-demo/* . /usr/share/nginx/html # rm -rf nginx-front-demo $ curl -X GET [the PAR link] ### The expected result like this in JSON--> {"objects":[{"name":"Ampere-SC_reel.tgz"},{"name":"CloudNative_Aa.tgz"},{"name":"nginx-front-demo.tgz"},{"name":"video-demo.zip"}]}%
h.Run the command below to execute shell of “nginx-front-app-0” pod, then the console is ready, execute the following commands with the newly generated Pre-Authenticated Request
$ kubectl exec -it nginx-front-app-0 -- sh / # cd /usr/share/nginx/html/ /usr/share/nginx/html # wget [the PAR link]nginx-front-demo.tgz /usr/share/nginx/html # tar zxvf nginx-front-demo.tgz /usr/share/nginx/html # mv nginx-front-demo/* . /usr/share/nginx/html # rm -rf nginx-front-demo
i.Continuing the console, we need to update the URLs with the domain name, vod.oke.amperedemo.site, in each video player HTML files from Step 10
/usr/share/nginx/html # sed -i "s,http://\[vod-demo\]/,http://vod.oke.amperedemo.site/,g" *.html /usr/share/nginx/html # sed -i "s,Pytorch,PyTorch,g" *.html /usr/share/nginx/html # exit
j.Then repeat 11.f - 11.i for the other 2 pods, nginx-front-app-1 and nginx-front-app-2
k.Run the command below to execute shell of “nginx-vod-app-0” pod, then the VOD container console is ready, execute the following commands
$ kubectl exec -it nginx-vod-app-0 -- sh / # cd /opt/static/videos/ /opt/static/videos # wget [the PAR link]vod-demo.tgz /opt/static/videos # tar zxvf vod-demo.tgz /opt/static/videos # mv vod-demo/* . /opt/static/videos # rm -rf vod-demo /opt/static/videos # sed -i "s,Pytorch,PyTorch,g" *.vtt /opt/static/videos # exit
l.Then repeat 11.k for the other VOD pods, nginx-vod-app-1 and nginx-vod-app-2
m. The VOD PoC demo is ready for testing
12. Open a browser with the link http://demo.oke.amperedemo.site/
13. Access the pods of nginx-front-app via a browser to test the VOD PoC demo
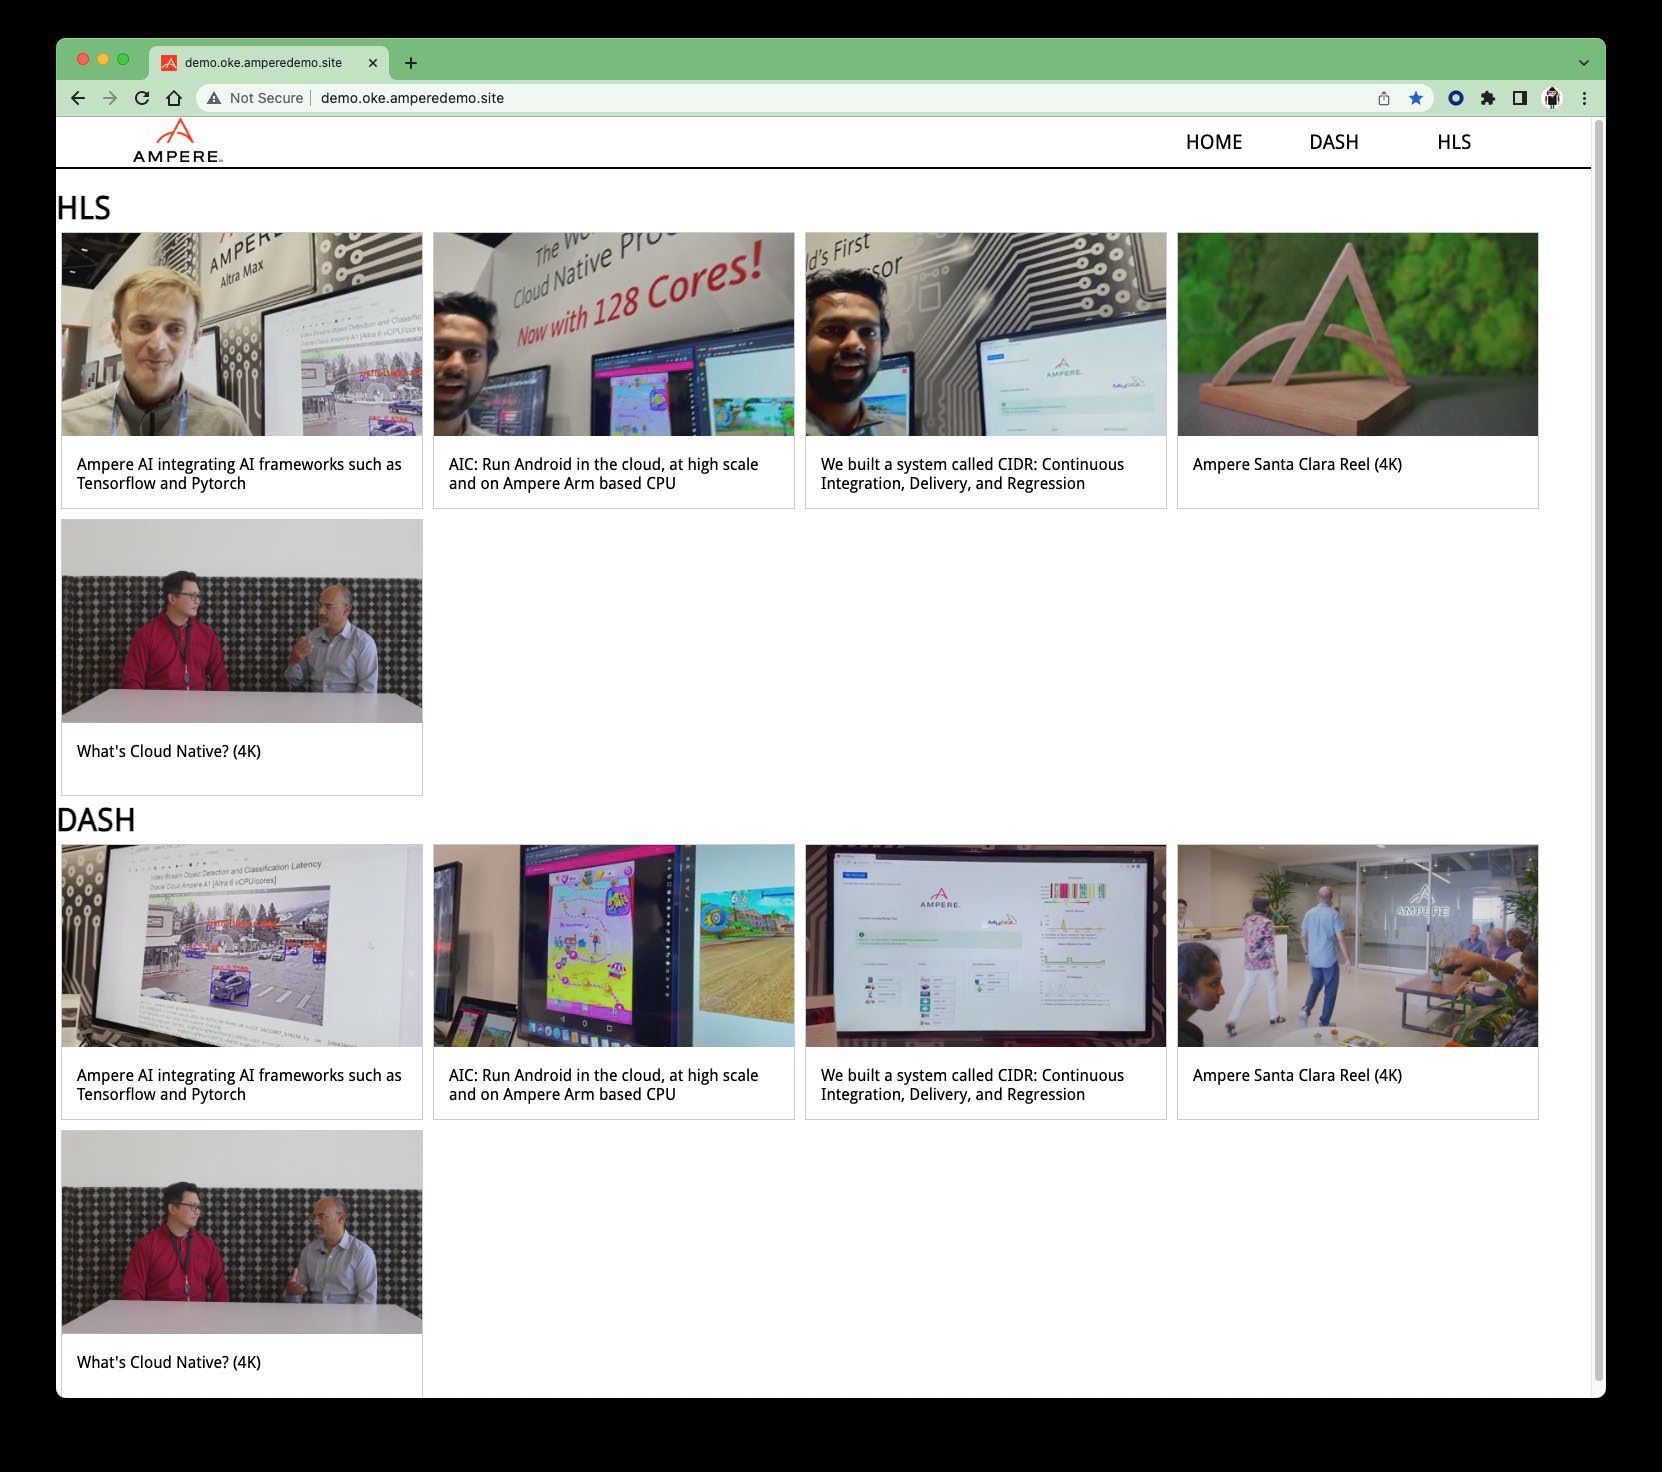 Figure A-11
14. By clicking one of tiles, the browser will bring the HTML5 video player for streaming video
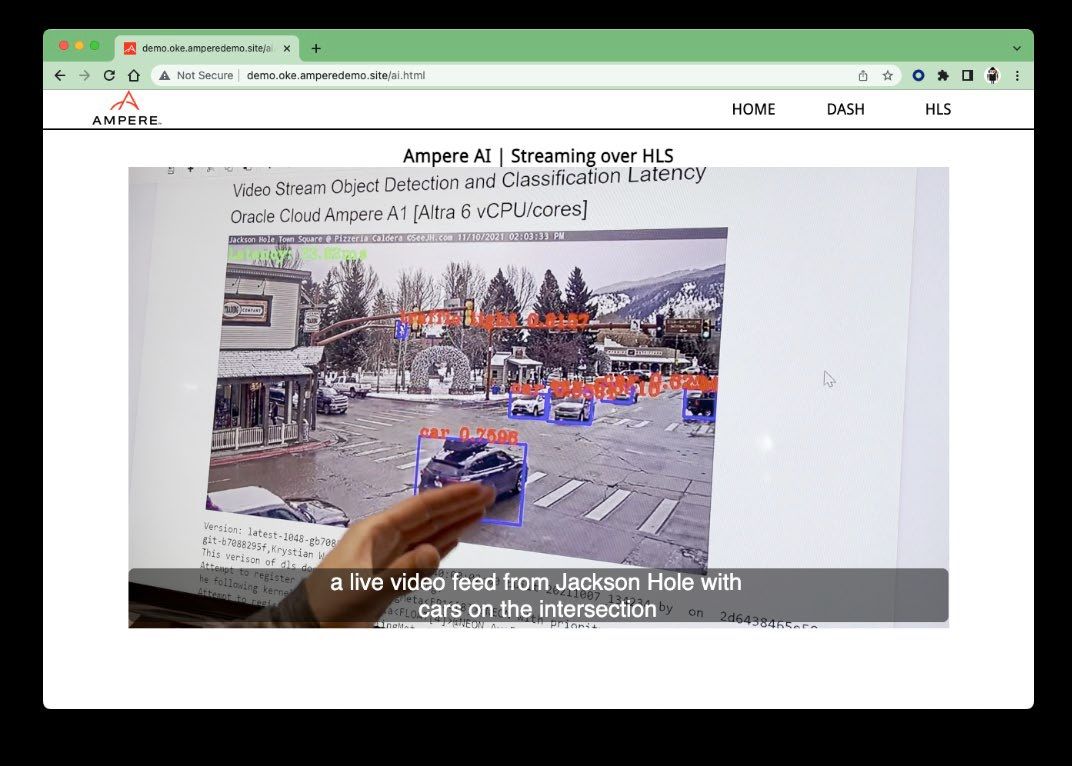 Figure A-12
Disclaimer
November 7, 2022 Ampere Computing reserves the right to change or discontinue this product without notice. While the information contained herein is believed to be accurate, such information is preliminary, and should not be relied upon for accuracy or completeness, and no representations or warranties of accuracy or completeness are made. The information contained in this document is subject to change or withdrawal at any time without notice and is being provided on an “AS IS” basis without warranty or indemnity of any kind, whether express or implied, including without limitation, the implied warranties of non-infringement, merchantability, or fitness for a particular purpose. Any products, services, or programs discussed in this document are sold or licensed under Ampere Computing’s standard terms and conditions, copies of which may be obtained from your local Ampere Computing representative. Nothing in this document shall operate as an express or implied license or indemnity under the intellectual property rights of Ampere Computing or third parties. Without limiting the generality of the foregoing, any performance data contained in this document was determined in a specific or controlled environment and not submitted to any formal Ampere Computing test. Therefore, the results obtained in other operating environments may vary significantly. Under no circumstances will Ampere Computing be liable for any damages whatsoever arising out of or resulting from any use of the document or the information contained herein.
Ampere Computing reserves the right to make changes to its products, its datasheets, or related documentation, without notice and warrants its products solely pursuant to its terms and conditions of sale, only to substantially comply with the latest available datasheet. Ampere, Ampere Computing, the Ampere Computing and ‘A’ logos, and Altra are registered trademarks of Ampere Computing. Arm is a registered trademark of Arm Limited (or its subsidiaries) in the US and/or elsewhere. All other trademarks are the property of their respective holders. Copyright © 2022 Ampere Computing. All rights reserved.
