

Deploy Red Hat OpenShift 4.11 as Single Node for the Edge
On Ampere Altra Family Platforms
Overview
This tutorial guide describes the steps to deploy Red Hat OpenShift Container Platform 4.11 on Single Node for edge computing workloads by Assisted Installer on Ampere® Altra® platforms. The steps to install Rook Ceph Operator for block storage are also described. This tutorial takes one hour to complete.
The hype around Edge Computing is growing as edge workloads and use cases appearing in many locations, technical requirements, and smaller physical footprints. The cloud native way to developing and deploying applications is increasingly being adopted in the edge computing territory.
At Ampere, we observe the trend of infrastructure providers and application owners wanting a consistent workload life cycle and predictable performance across the business. The Ampere Altra processor family provides the following values for edge workloads:
- High core counts in single socket processor
- Predictability for less jitter and lower latency while protecting against noisy neighbor effects in the processor
- Linear Scalability to maximize heavily loaded server performance such as CDN Edge appliance
- The most sustainable, low power architecture for power sensitive edge locations and more efficient Data Centers
- Scale-out computational horsepower with optimized video codecs for high performance video transcoding
Prerequisites
A DNS service like bind (named) runs on the bastion node.
Setup Instructions
Deploy OpenShift 4.11
The following is a step-by-step guide for installing OpenShift Container Platform 4.11 with Assisted Installer on the Ampere Altra Platform.
1. Login to http://cloud.redhat.com, click OpenShift, and then click Data Center for Bare Metal(Arm64) and Create Cluster for a new cluster.
2. Click the Assisted Installer icon.
![]()
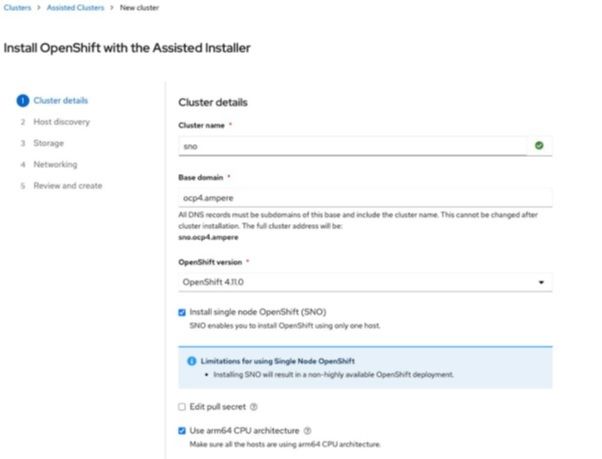
3. Provide the domain name, cluster name, and IP addresses for the target node for the cluster details. In this example, we choose the static IP address.
a)this tutorial, a local DNS is used for managing domain names under ocp4.ampere and uses sno as the cluster/node name.
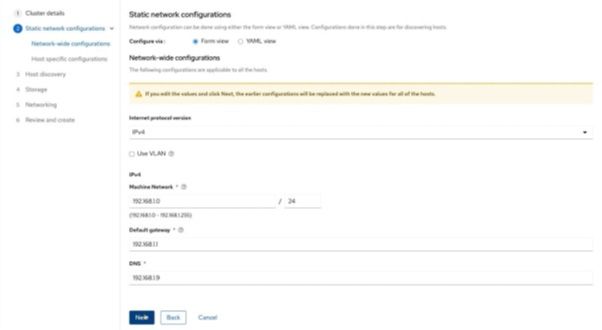
b) Enter the static IP address range, default gateway, and DNS.
c) Enter the MAC address and assigned IP address on the Internet-access NIC on the target node.

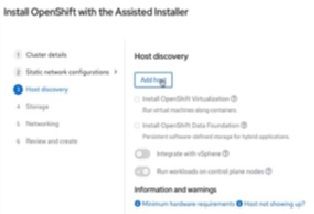
d) Click Add host in Step 3 Host discovery.
e) The web console prompts for a diagram for generating a Discovery ISO image for provisioning the target node. For provisioning bare metal, select Full image file.
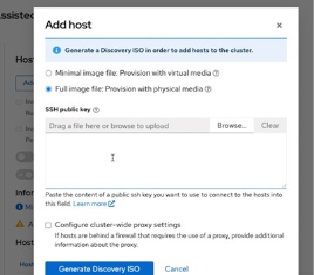
f) Drag an SSH public key file or enter the contents of an SSH public key from the bastion node to access the target node later. Then click Generate Discovery ISO. The web console embeds the SSH key into the Discovery ISO image.
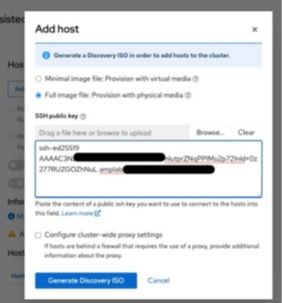
g) The web console prompts for the ISO URL or the wget command for downloading the Discovery ISO image.
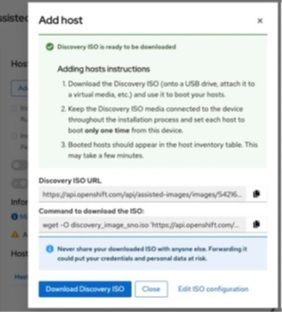
4. Prepare and download the Discovery ISO image for OCP 4.11.
$ wget -O discovery_image_ocp4.iso 'https://api.openshift.com/api/assisted-images/images/
[TOKEN1]?arch=arm64&image_token=[IMAGE_TOKEN]&type=full-iso&version=4.11'5. Review the target system’s status and execute the following commands to clean up the node with Red Hat Enterprise Linux CoreOS Live CD. This step is optional but needed if your hardware has been used for other projects or provisioned with OS. Assume there are six NVMe drives (1x M.2 for OS and 5x U.2 for data storage) per node.
a) Download the live CD.
$ wget "https://mirror.openshift.com/pub/openshift-v4/arm64/dependencies/rhcos/4.11/latest/rhcos-live.aarch64.iso"
b) Mount the live CD with KVM on the BMC. Once the system is loaded, execute the following script to clean up the drives, and then power off the system.
$ for DISK in "/dev/nvme0n1" "/dev/nvme1n1" "/dev/nvme2n1" "/dev/nvme3n1" "/dev/nvme4n1" "/dev/ nvme5n1" ; do echo $DISK && \ sgdisk --zap-all $DISK && \ dd if=/dev/zero of="$DISK" bs=1M count=100 oflag=direct,dsync && \ blkdiscard $DISK done $ poweroff
6. Mount the Discovery ISO image for OCP 4.11 with KVM on the BMC on the target node.
a) Click Browse File on the top right of the KVM browser.

b) The KVM dialog opens a dialog box to search for the target ISO image in a directory. Enter discovery_image_sno.iso.

c) Click Start Media to mount the ISO image to the target node.

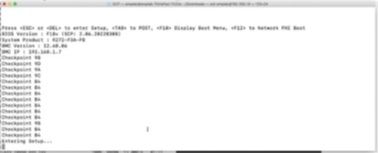
7. Use the ipmitool SOL function to monitor the installation.
ipmitool -H [BMC IP address] -I lanplus -U [username] -P [password] sol activate
8. When the node is loaded with Red Hat Enterprise Linux CoreOS (RHCOS) and is updating its status to http://cloud.redhat.com, the Assisted Installer web page also shows the status for each phase on the cluster.

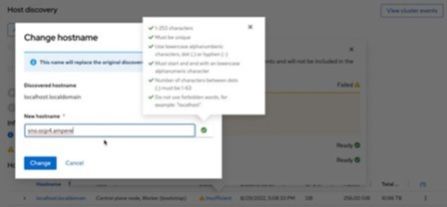
a) If the Assisted Installer web page shows the host status as Insufficient, and its hostname as localhost.localdomain,
 click the link for Insufficient and change the hostname.
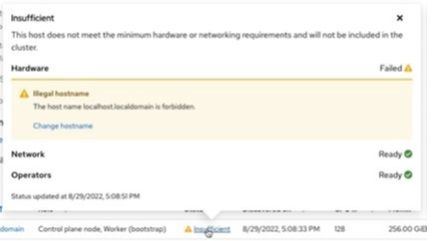
b) Change hostname as an FQDN for making the node ready. In this example, change the hostname to sno.ocp4.ampere.
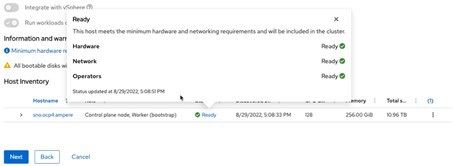
c) The Assisted Installer page shows the host status as Ready with the proper hostname. Click Next to go to Step 4, Storage.
d) The Storage page lists all storage devices. Select one of the storage devices as the boot drive for RHCOS, and then click Next.

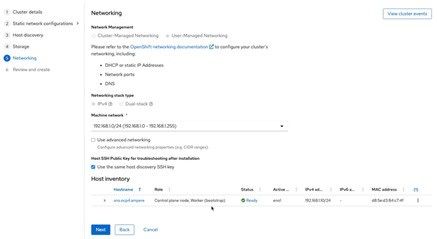
e) The Networking page the network information as **User-Managed Networking **including the machine network. Click Next to go to the next step.
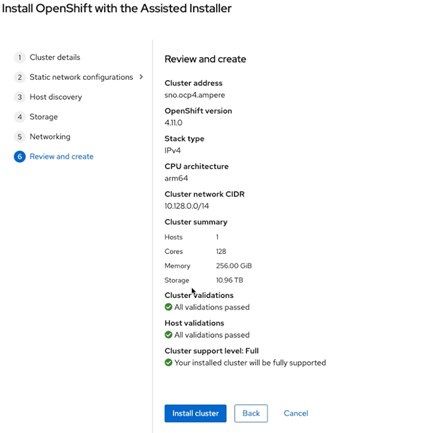
f) Review the Single Node OpenShift configuration, and then click Install cluster to start the Assisted Installation.
g) The Assisted Installer page shows the status of the node as Preparing for installation and the role of “Control Plane node, Worker (bootstrap)”.
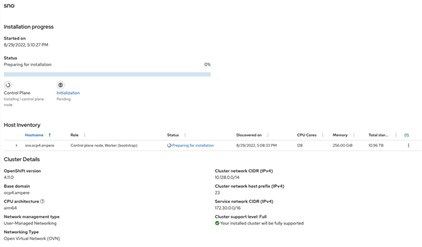
h) Click the Status link to view the step on which the Assisted Install is working.
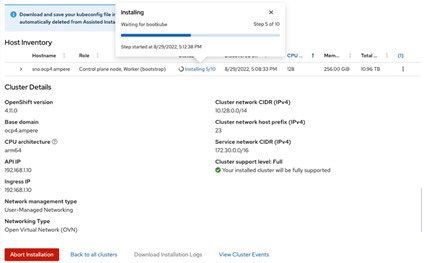
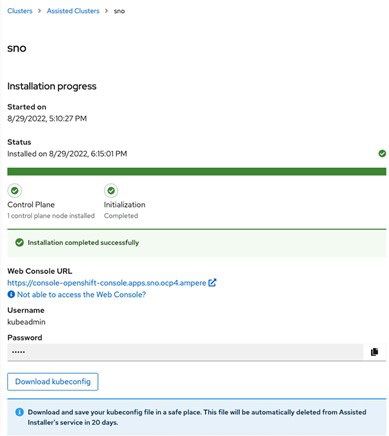
9. After approximately 35-63 minutes (depending on the Internet bandwidth), the Single Node OpenShift 4.11 is ready. The window shows the OpenShift Web Console URL along with the username and password. It also provides a method to download your kubeconfig file which is automatically deleted from the Assisted Installer service in 20 days.
10. Access the OpenShift Console using the predefined URL https://console-openshift-console.apps.sno.ocp4.ampere or use kubectl or oc with the kubeconfig file downloaded from http://cloud.redhat.com to access the Single Node OpenShift. The Nodes page shows one nod with two roles.
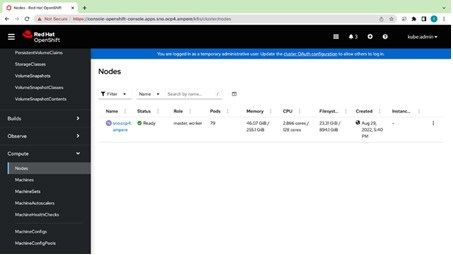 There is one node in the cluster.

Deploying Rook Ceph Operator
1. On the bastion node, use git to pull Rook Ceph Operator v.1.10.0.
$ git clone --single-branch --branch v1.10.0 https://github.com/rook/rook.git $ mv rook rook-1.10.0 $ mv rook rook-1.10.0 $ cd rook-1.10.0/deploy/examples/
2. Prepare a cluster.yaml for Single Node OpenShift Ceph.
$ cat << EOF > sno-cluster.yaml
---
kind: ConfigMap
apiVersion: v1
metadata:
name: rook-config-override
namespace: rook-ceph
data:
config: |
[global]
osd_pool_default_size = 1
---
apiVersion: ceph.rook.io/v1
kind: CephCluster
metadata:
name: rook-ceph
namespace: rook-ceph
spec:
cephVersion:
image: quay.io/ceph/ceph:v17.2.3
allowUnsupported: false
dataDirHostPath: /var/lib/rook
skipUpgradeChecks: false
continueUpgradeAfterChecksEvenIfNotHealthy: false
waitTimeoutForHealthyOSDInMinutes: 10
mon:
count: 1
allowMultiplePerNode: true
mgr:
count: 1
allowMultiplePerNode: true
modules:
- name: pg_autoscaler
enabled: true
dashboard:
enabled: true
ssl: true
monitoring:
enabled: false
network:
connections:
encryption:
enabled: false
compression:
enabled: false
crashCollector:
disable: false
cleanupPolicy:
confirmation: ""
sanitizeDisks:
method: quick
dataSource: zero
iteration: 1
allowUninstallWithVolumes: false
annotations:
labels:
resources:
removeOSDsIfOutAndSafeToRemove: false
priorityClassNames:
mon: system-node-critical
osd: system-node-critical
mgr: system-cluster-critical
storage:
useAllNodes: true
useAllDevices: true
devices:
- name: "nvme0n1"
- name: "nvme1n1"
- name: "nvme2n1"
- name: "nvme3n1"
- name: "nvme4n1"
config:
osdsPerDevice: "1"
onlyApplyOSDPlacement: false
disruptionManagement:
managePodBudgets: false
osdMaintenanceTimeout: 30
pgHealthCheckTimeout: 0
manageMachineDisruptionBudgets: false
machineDisruptionBudgetNamespace: openshift-machine-api
healthCheck:
daemonHealth:
mon:
disabled: false
interval: 45s
osd:
disabled: false
interval: 60s
status:
disabled: false
interval: 60s
livenessProbe:
mon:
disabled: false
mgr:
disabled: false
osd:
disabled: false
startupProbe:
mon:
disabled: false
mgr:
disabled: false
osd:
disabled: false
EOF3. Prepare StorageClass for single node OpenShift.
$ cat << EOF > sno-storageclass.yaml
---
apiVersion: ceph.rook.io/v1
kind: CephBlockPool
metadata:
name: replicapool
namespace: rook-ceph
spec:
failureDomain: host
replicated:
size: 1
---
apiVersion: storage.k8s.io/v1
kind: StorageClass
metadata:
name: rook-ceph-block
provisioner: rook-ceph.rbd.csi.ceph.com
parameters:
clusterID: rook-ceph
pool: replicapool
imageFormat: "2"
imageFeatures: layering
csi.storage.k8s.io/provisioner-secret-name: rook-csi-rbd-provisioner
csi.storage.k8s.io/provisioner-secret-namespace: rook-ceph
csi.storage.k8s.io/controller-expand-secret-name: rook-csi-rbd-provisioner
csi.storage.k8s.io/controller-expand-secret-namespace: rook-ceph
csi.storage.k8s.io/node-stage-secret-name: rook-csi-rbd-node
csi.storage.k8s.io/node-stage-secret-namespace: rook-ceph
csi.storage.k8s.io/fstype: ext4
reclaimPolicy: Delete
allowVolumeExpansion: true
EOF4. Deploy CRDs, common, and operator yaml files.
$ oc create -f crds.yaml -f common.yaml $ oc create -f operator-openshift.yaml $ oc create -f sno-cluster.yaml $ oc create -f toolbox.yaml $ oc create -f sno-storageclass.yaml $ oc create -f csi/rbd/snapshotclass.yaml
5. Set rook-ceph-block as the default StorageClass.
$ oc patch storageclass rook-ceph-block -p '{"metadata": {"annotations":{"storageclass.kubernetes.io/is-default-class":"true"}}}'
6. After a few minutes, the Ceph service is ready on the rook-ceph namespace.
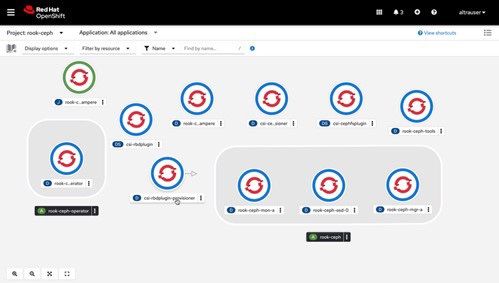
7. Since the rook Ceph tool was deployed, use the following commands to check the Ceph status and health details.
$ oc -n rook-ceph exec -it $(oc -n rook-ceph get pod -o name | egrep rook-ceph-tool ) -- ceph status $ oc -n rook-ceph exec -it $(oc -n rook-ceph get pod -o name | egrep rook-ceph-tool ) -- ceph health detail
8. Prepare a PVC yaml file for testing the Ceph service’s readiness.
$ cat << EOF > example-pvc.yaml apiVersion: v1 kind: PersistentVolumeClaim metadata: name: example-pvc labels: app: example-app spec: accessModes: - ReadWriteOnce volumeMode: Filesystem resources: requests: storage: 100Gi storageClassName: rook-ceph-block EOF
9. Run the following commands to verify Persistent Volume Claim.
$ oc project default Now using project "default" on server "https://api.sno.ocp4.ampere:6443". $ oc create -f example-pvc.yaml persistentvolumeclaim/example-pvc created $ oc get pvc NAME STATUS VOLUME CAPACITY ACCESS MODES STORAGECLASS AGE example-pvc Bound pvc-46f05da5-a1cb-4212-91b3-2525e8326676 100Gi RWO rookceph- block 10s $ oc delete -f example-pvc.yaml persistentvolumeclaim "example-pvc" deleted
10. The Single Node OpenShift is ready for running workloads.
Revision History
| ISSUE | DATE | DESCRIPTION |
|---|---|---|
| 1.00 | November 7, 2022 | Initial release. |
Disclaimer
November 7, 2022 Ampere Computing reserves the right to change or discontinue this product without notice. While the information contained herein is believed to be accurate, such information is preliminary, and should not be relied upon for accuracy or completeness, and no representations or warranties of accuracy or completeness are made. The information contained in this document is subject to change or withdrawal at any time without notice and is being provided on an “AS IS” basis without warranty or indemnity of any kind, whether express or implied, including without limitation, the implied warranties of non-infringement, merchantability, or fitness for a particular purpose. Any products, services, or programs discussed in this document are sold or licensed under Ampere Computing’s standard terms and conditions, copies of which may be obtained from your local Ampere Computing representative. Nothing in this document shall operate as an express or implied license or indemnity under the intellectual property rights of Ampere Computing or third parties. Without limiting the generality of the foregoing, any performance data contained in this document was determined in a specific or controlled environment and not submitted to any formal Ampere Computing test. Therefore, the results obtained in other operating environments may vary significantly. Under no circumstances will Ampere Computing be liable for any damages whatsoever arising out of or resulting from any use of the document or the information contained herein.
Ampere Computing reserves the right to make changes to its products, its datasheets, or related documentation, without notice and warrants its products solely pursuant to its terms and conditions of sale, only to substantially comply with the latest available datasheet. Ampere, Ampere Computing, the Ampere Computing and ‘A’ logos, and Altra are registered trademarks of Ampere Computing. Arm is a registered trademark of Arm Limited (or its subsidiaries) in the US and/or elsewhere. All other trademarks are the property of their respective holders. Copyright © 2022 Ampere Computing. All rights reserved.
Ampere Computing LLC
4655 Great America Parkway Suite 601
Santa Clara, CA 95054


