How to get an Azure Ampere Virtual Machine Up and Running Using Terraform
Ampere Azure VM Setup
What We Will Do
- Create an Azure Ampere Ubuntu 20.04 instance
- Add in some basic tools: git, curl, python, docker, etc.
- Run 'lscpu' to prove that the VM is working
- Destroy the instance
When you complete this tutorial, you will have a working Ubuntu 20.04 instance with some common tools. Since we don’t know what type of account you have (a free account or something from your company), we are just going to create a small 2 core VM instance using Terraform. The reason to use Terraform is that it automates the creation and destruction and is easy to start with. However, it does have a learning curve for its more advanced features. Just follow the directions to get the VM up and running. Afterwards, you can look through the files and start to understand what Terraform is doing.
Prerequisites
Make sure that you have:
- Terraform installed
- A Microsoft Azure Account
- The Microsoft Azure CLI installed.
Clone the Terraform Azure Ampere Repo
Open a terminal window and navigate to where you want to place the code and clone this repo
git clone https://github.com/AmpereComputing/terraform-azure-ampere-vm.git
Login to Your Azure Account
To log into the Azure CLI tool, type the following command into your console
az login
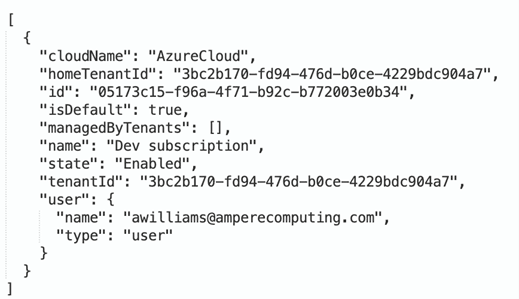
A web browser will open. Select the Azure account you wish to log into. Once you are logged in, the response on the console should look like this:

Copy and paste your output into your favorite text editor, we will need the “id” and “tenantId” in a couple of moments.
Create the terraform.tfvars File
- Go to the terraform-azure-ampere-vm/examples/ubuntu2004 folder:
cd terraform-azure-ampere-vm/examples/ubuntu2004
- Create terraform.tfvars file
nano terraform.tfvars
- In the terraform.tfvars file add in these three variables at the top:
subscription_id = "12345678-abcd-1234-abcd-1234567890ab" tenant_id = "87654321-dcba-4321-dcba-ba0987654321" vm_size = "Standard_D2ps_v5"
- Make sure that you change the value for “subscription_id” to that of “id” and “tenant_id” to “tenant_id” that were given to you when you logged in.
Note: in Terraform, there is a difference between the smart quotation marks that Word uses and ASCII ones that Terraform uses. Make sure you are using the straight up and down ones (ASCII).
The vm size that we will create is a small 2 core Ampere/ARM64 instance, small enough that it will work on a free account. At the end of this document, we will explain the naming convention.
Edit main.tf
- Open the “main.tf” file that is in the same folder as “terraform.tfvars” file
nano main.tf
- Make sure that there are three variables at the top:
variable "subscription_id" {} variable "tenant_id" {} variable "vm_size" {}
- In the module block, verify that “subscription_id”, “tenant_id”, and “vm_size” are there and not commented out.
Note: we are using “westus2” as the location of the region. If you have access to that region, just leave it for now. If you don’t have access, change it to one that has Azure Ampere instances available.

Build the Instance
Make sure that everything is saved and run the command:
terraform init && terraform plan && terraform apply -auto-approve
If you receive a prompt asking you to enter in the subscription_id and/or the tenant_id, check the spelling of the file name: terraform.tfvars and the spelling of subscription_id, tenant_id inside of the file.
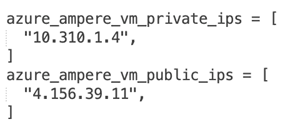
If everything worked correctly, you should see something like this:

The second one is your public IP address and now just SSH into your new VM.
ssh Into Your New VM
Type into the console
ssh -i azure-id_rsa ubuntu@5.154.37.11
And you should see your Azure Ubuntu prompt.

type in the command
lscpu
Response:

You will see that it is an aarch64 machine, there are 2 CPUs and it is a Neoverse-N1 device. This means that it is an Ampere Altra or Ampere Altra Max chip. And if you are like me and you noticed that it is Little Endian, here is the link to the Wikipedia article on Endian to remind you what that means.
Verify in the Azure Portal
If you now go to your Azure Portal and click on Virtual Machines, you will see your VM there.

Destroy Your VM
And our final move will be to destroy the VM and clean everything up.
Go back to your terminal window and type
Exit
to leave your remote session and get back to your local machine.
Now type
terraform destroy
Terraform will come back and verify that you really want to do this, then type
yes
When it is done, everything will be destroyed. Go to your Azure Portal to verify that the VM is gone, and all the resource groups are gone to.
Create Another VM
To create another VM, just run the Terraform init command again.
terraform init && terraform plan && terraform apply -auto-approve
See how quick an easy it was to start a new one? Just remember to destroy it if you don’t want it around.
Notes/Things to Try
When you do the destroy command, Terraform goes off and builds everything it needs, then comes back and confirms that you want to destroy it. For me, I keep forgetting to type that yes. It won’t delete until it is confirmed.
Create two or more VMs. In “main.tf”, there is a variable called “azure_vm_count”. This is the number of VMs that will be created. Change it to 2 and two VMs will be created.
You can change the location by putting in a different region in the location variable. In this example we have been using “West US 2”
Naming convention for the instance that we created: “Standard_D2ps_v5z”. The p means Ampere/ARM64 and the number “2” is the number of vCPU and p means ARM. So, if you want a 16 vCPU instance, change the 2 to 16. For the other meanings, check out the Azure VM Naming Conventions site.
What’s Next
Yes, this was a simple example, but if you are new to Terraform, you are probably starting to realize, how powerful it can be. To see some more examples, look through the rest of our GitHub page, visit our community, or visit our Developer Portal.
