
TUNING GUIDE
Optimizing Arm-based Build Servers with AmpereOne CPUs
Optimizing Arm-based Build Servers with AmpereOne CPUs
What Makes a Good Build Server?
In modern cloud native application development, Continuous Integration, with automated building and testing of software on every commit, has become a standard best practice. This typically involves maintaining a farm of build nodes, which can be physical devices, virtual machines, or containers, that can be provisioned on demand and retired once build tasks are completed.
This guide aims to help you configure the ultimate build server for Ampere's Arm-based architecture. We will explore various configuration options (or “knobs and switches”) to optimize a Linux build server’s performance, detailing the performance improvement with each adjustment.
This tuning guide will focus on building LLVM-MinGW, a toolchain for creating Windows binaries using the LLVM project. This will be conducted on a Fedora 40 server running on an Ampere® Altra® 128 core server, and compared with results from AmpereOne® 192 core servers, highlighting the advancements in that CPU.
What Build Server Workloads Look Like
Running software builds and testing workloads on a modern build server are inherently dynamic. They typically feature short bursts of CPU-intensive tasks, interspersed with other tasks that aren't as CPU-intense. Figure 1 illustrates this CPU utilization behavior over time, which we will discuss later. While many build tasks, such as compiling source files, can execute in parallel across numerous CPU cores, other steps are inherently serial, including initial build configuration and linking. Therefore, optimizing complex builds means effectively managing these concurrent processes around unavoidable serial choke points
To build the best possible build server, we aim to ensure that our compilation processes remain uninterrupted, that we avoid saturating the system's disk I/O, and that we minimize memory thrashing. This specifically includes minimizing memory page allocation and TLB misses. Furthermore, when builds can be parallelized, it is crucial to keep all available cores busy.
Using All Your Cores
Modern build servers derive most of their performance from parallel compilation. If your build system is not explicitly configured to execute tasks concurrently, large multi-core systems will be underutilized and build times will scale very poorly.
For GNU Make, parallelism is explicit:
make -j<N>
where -j<N> represents the number of parallel jobs to be started, typically set to the number of available CPU cores (for example, up to -j128 on Ampere Altra or up to -j192 on AmpereOne).
Most modern build systems provide similar mechanisms:
- CMake: Parallelism is controlled by the underlying build tool:
cmake --build . --parallel <N>
or by passing -j<N> to make or ninja
- Ninja: Parallel by default; concurrency can be limited with:
ninja -j<N>
- Maven: Supports parallel module and project builds:
mvn -T <N> or -T <N>C (cores)
Gradle: Enables parallel task execution:
gradle build --parallel
Or via org.gradle.workers.max= <N>
SCons: Similar to Make and Ninja, uses –j:
scons -j<N>
Building LLVM-MinGW
We describe building the LLVM-MinGW project to highlight the steps we used to optimize an Ampere-based build server. LLVM-MinGW is a toolchain to build Windows binaries using the LLVM project that supports the i686, x86_64, armv7 and arm64 architectures. The LLVM-mingw repository provides detailed documentation about the project.
After cloning the git repo, we set up a 50 GB RAM disk to run the build on to improve performance. We use the build-all.sh script to run the build for 5 different architectures specified in the TOOLCHAIN_ARCHS variable.
git clone https://github.com/mstorsjo/llvm-mingw.git ode
# Create RAM disk mkdir llvm-mingw-tmpfs sudo mount | grep llvm-mingw-tmpfs mount -t tmpfs -o size=50G,mode=1777 tmpfs ./llvm-mingw-tmpfs
# run build from RAM disk LOG=build-llvm-mingw.log cd llvm-mingw-tmpfs && rm -rf * && cp -r ../llvm-mingw/* . && TOOLCHAIN_ARCHS="i686 x86_64 armv7 aarch64 arm64ec" LLVM_CMAKEFLAGS="-DLLVM_ENABLE_LIBXML2=OFF -DLLDB_ENABLE_PYTHON=OFF -DLLVM_USER_LINKER=lld -DCMAKE_C_COMPILER=/usr/bin/clang -DCMAKE_CXX_COMPILER=/usr/bin/clang++" /usr/bin/time -f '%U, %S, %e, %P' ./build-all.sh --disable-lldb-mi $(pwd)/install/llvm-mingw >& ${LOG}
RAM DISK – Using DRAM to Avoid Disk I/O
A RAM disk is a filesystem backed by system memory rather than persistent storage. On Linux, this is typically implemented using tmpfs, which allows a directory to behave like a regular filesystem while storing its contents in RAM. Reads and writes to a RAM disk occur at memory speed and much faster than reading from disks or SSDs.
On a build server, a RAM disk is commonly used to store temporary build artifacts such as object files, dependency caches, and intermediate outputs. The build system can then be configured to place its build directory, temporary files, or compiler cache under this path (for example, using an out-of-tree build directory). In our example, the entire build is done on the RAM disk.
RAM disks can improve performance because large parallel builds can generate and consume tens of thousands of small files, especially during compilation and linking. Even on fast NVMe SSDs, metadata operations and concurrent I/O can become a bottleneck when hundreds of compiler processes run in parallel. A RAM disk eliminates these I/O constraints by keeping all intermediate data in memory, reducing latency and contention.
On high core count servers running large parallel builds, this can significantly improve throughput by ensuring that compiler processes are not stalled waiting on disk access. The benefit is most visible when the build is otherwise CPU-bound, and sufficient memory is available to avoid swapping. In this configuration, a RAM disk helps the system sustain full CPU utilization across all cores, shortening end-to-end build times.
It is always recommended to measure the performance of any configuration changes to understand their impact and to verify that performance has improved. In this case, we tested building using a RAM disk vs. using the system SSD. The build took 1069.1 s running on the SSD and 1062.7 s using the RAM disk, for a ~0.6% speedup.
The mpstat utility, part of the sysstat package, was used to measure CPU utilization during the build, with the results plotted in Figure 1. This data shows that the overall CPU utilization is very low for the build, except for the region from ~100 - ~450 seconds and for brief spikes of high CPU utilization. Overall, the average build total CPU utilization was just 53.4% of the Ampere ® Altra ® 128 core server. This raised the question: Why is utilization so poor?
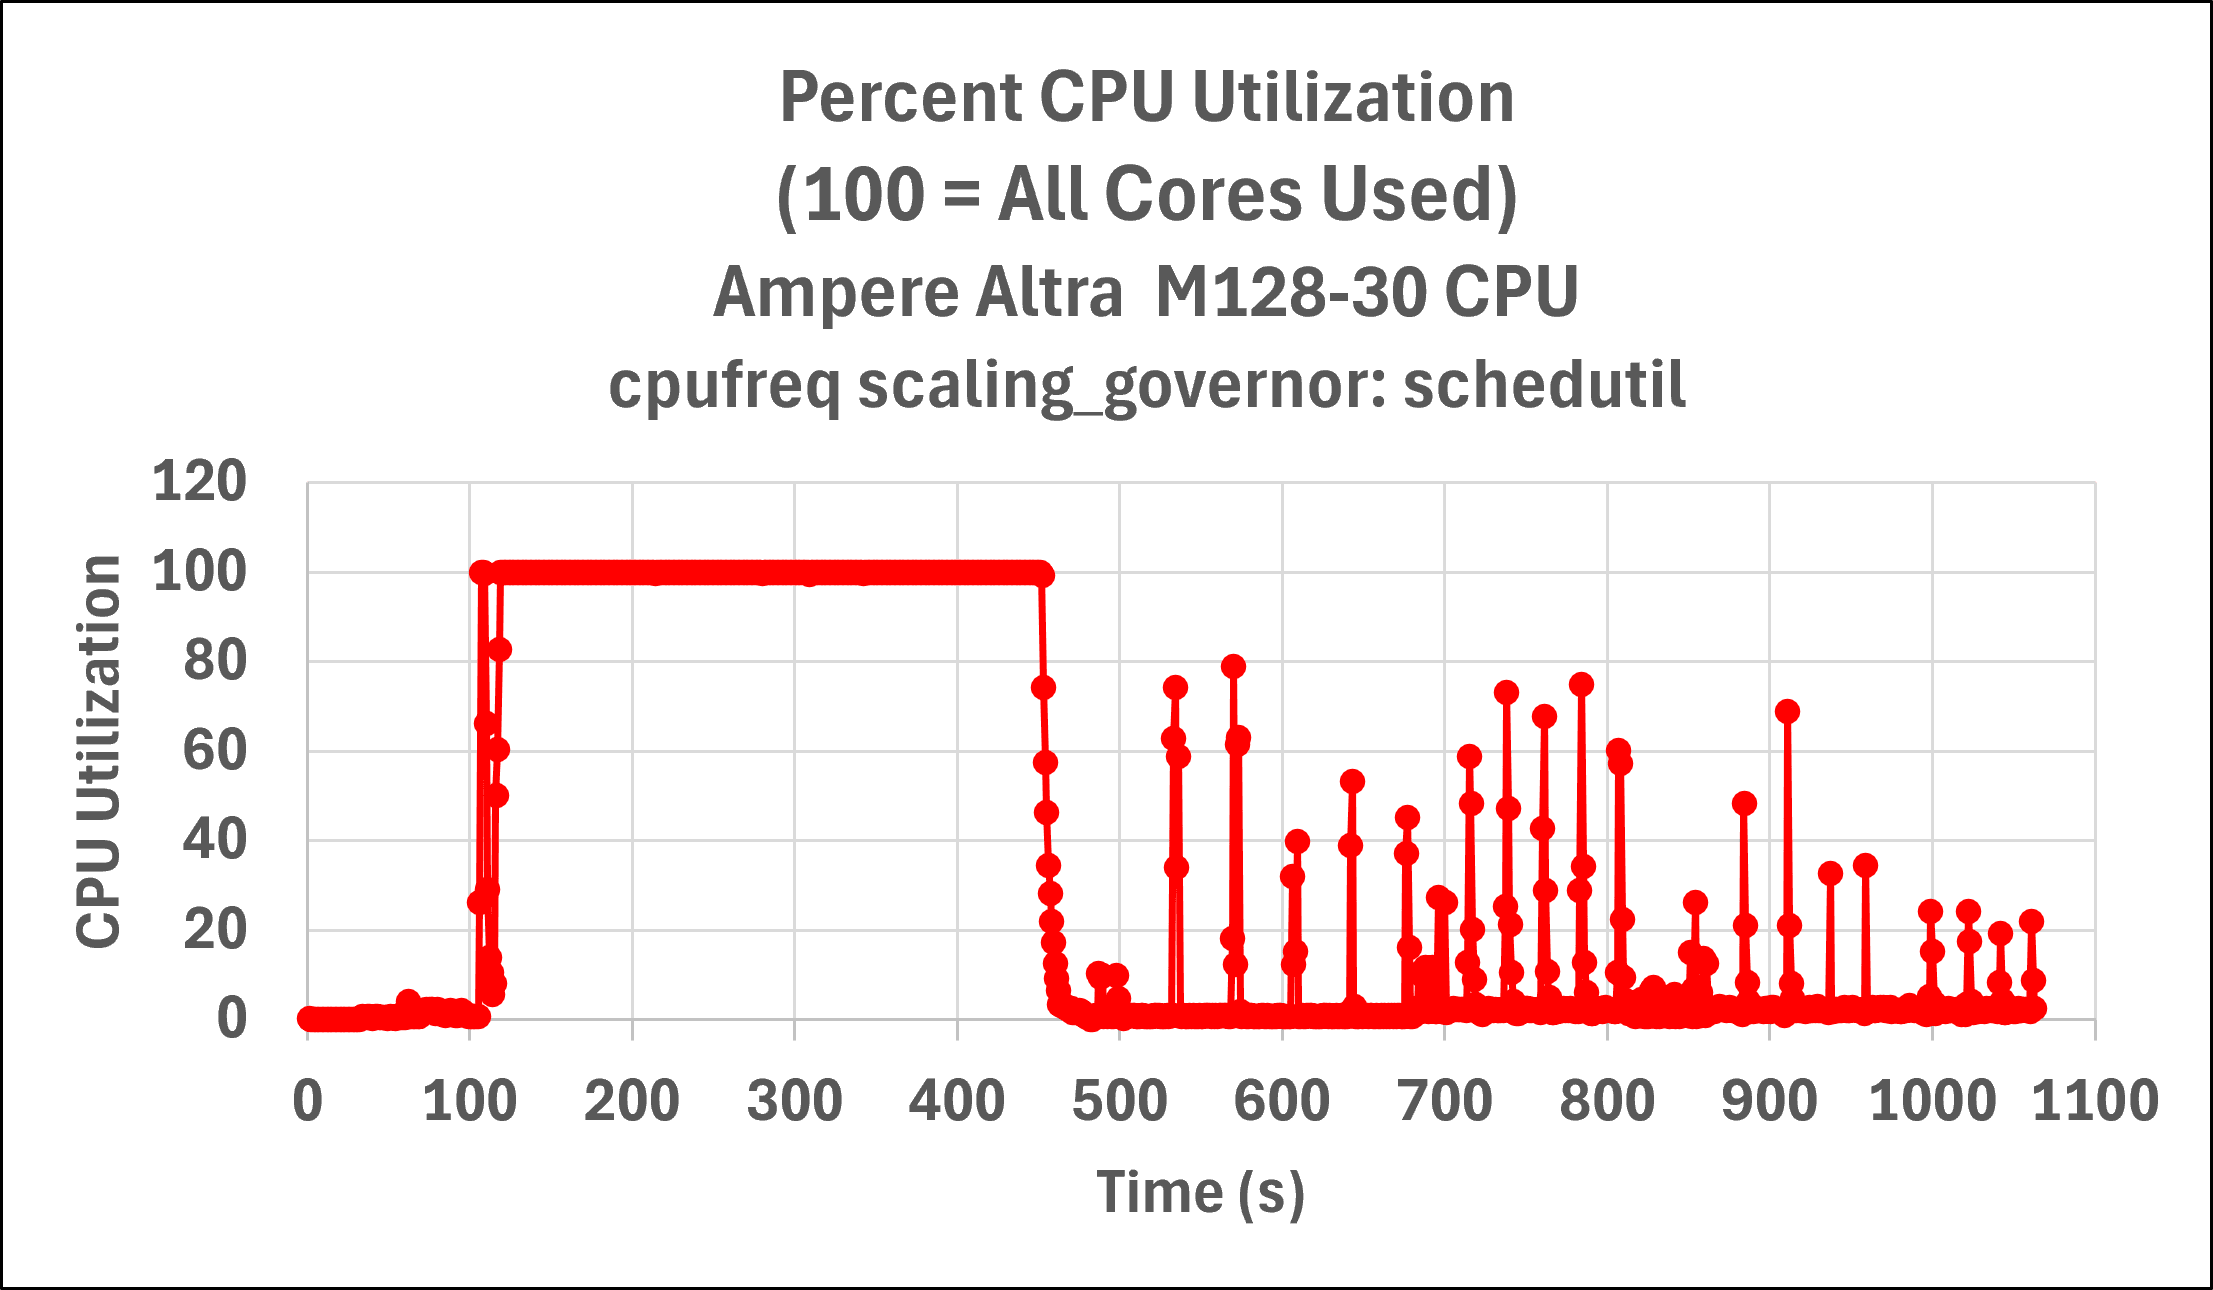
Fig 1: Server CPU utilization vs. time for initial LLVM-MinGW build, illustrating poor overall server utilization except for the region approximately 100 – 450 seconds.
Our initial studies focused on running the build using the perf record performance profiler to measure performance. Linux’s perf profiler is a very powerful tool that allows you to see what’s running on the CPU at the application level and drilling down to shared libraries, functions, individual source code lines and assembly instructions. However, sometimes a focus on low-level metrics prevents understanding global issues. This proved to be one such example. For this project, understanding the true bottleneck required higher-level performance data to grasp why the build was not utilizing the system more efficiently.
Instrumenting Build Scripts
The LLVM-MinGW build is complex, involving many sub-projects built with different configurations and architectures. To gain detailed insights, we implemented a powerful yet simple instrumentation method using bash’s PS4 variable. This approach inserted timestamps into the build log file before every executed command. By parsing the output log file, we could accurately determine the duration of each command. While analyzing and understanding the various, often nested, phases of the build took time, the instrumentation via bash’s PS4 variable was trivial to implement.
# Script to add timestamps to all scripts PS4='DEBUG $0 Line ${LINENO}, time since epoch, $(date "+ %s"): ' SCRIPTS=$(ls *sh) for SCRIPT in ${SCRIPTS}; do cp ${SCRIPT} ${SCRIPT}.orig sed -i '1d' ${SCRIPT} # remove #!/bin/sh line # converts existing scripts to bash scripts # with timestamps using bash’s PS4 cat ../convert_sh_to_bash_debug.sh ${SCRIPT} > bash_${SCRIPT} cp bash_${SCRIPT} ${SCRIPT} done chmod +x *.sh
Figure 2 shows example instrumented output. This output can be parsed to calculate the execution time of individual commands, such as this example of running cmake –G Ninja.

Fig 2: Example output after adding timestamps to the build.
After analyzing the build output with the timestamps we added, we identified significant time spent in processes that utilized only a single CPU core: running configure and cmake -G Ninja configuration phases and pulling sources via git. Now that we understood the significant serial phases of the build, we were ready to optimize the server configuration to improve the build performance.
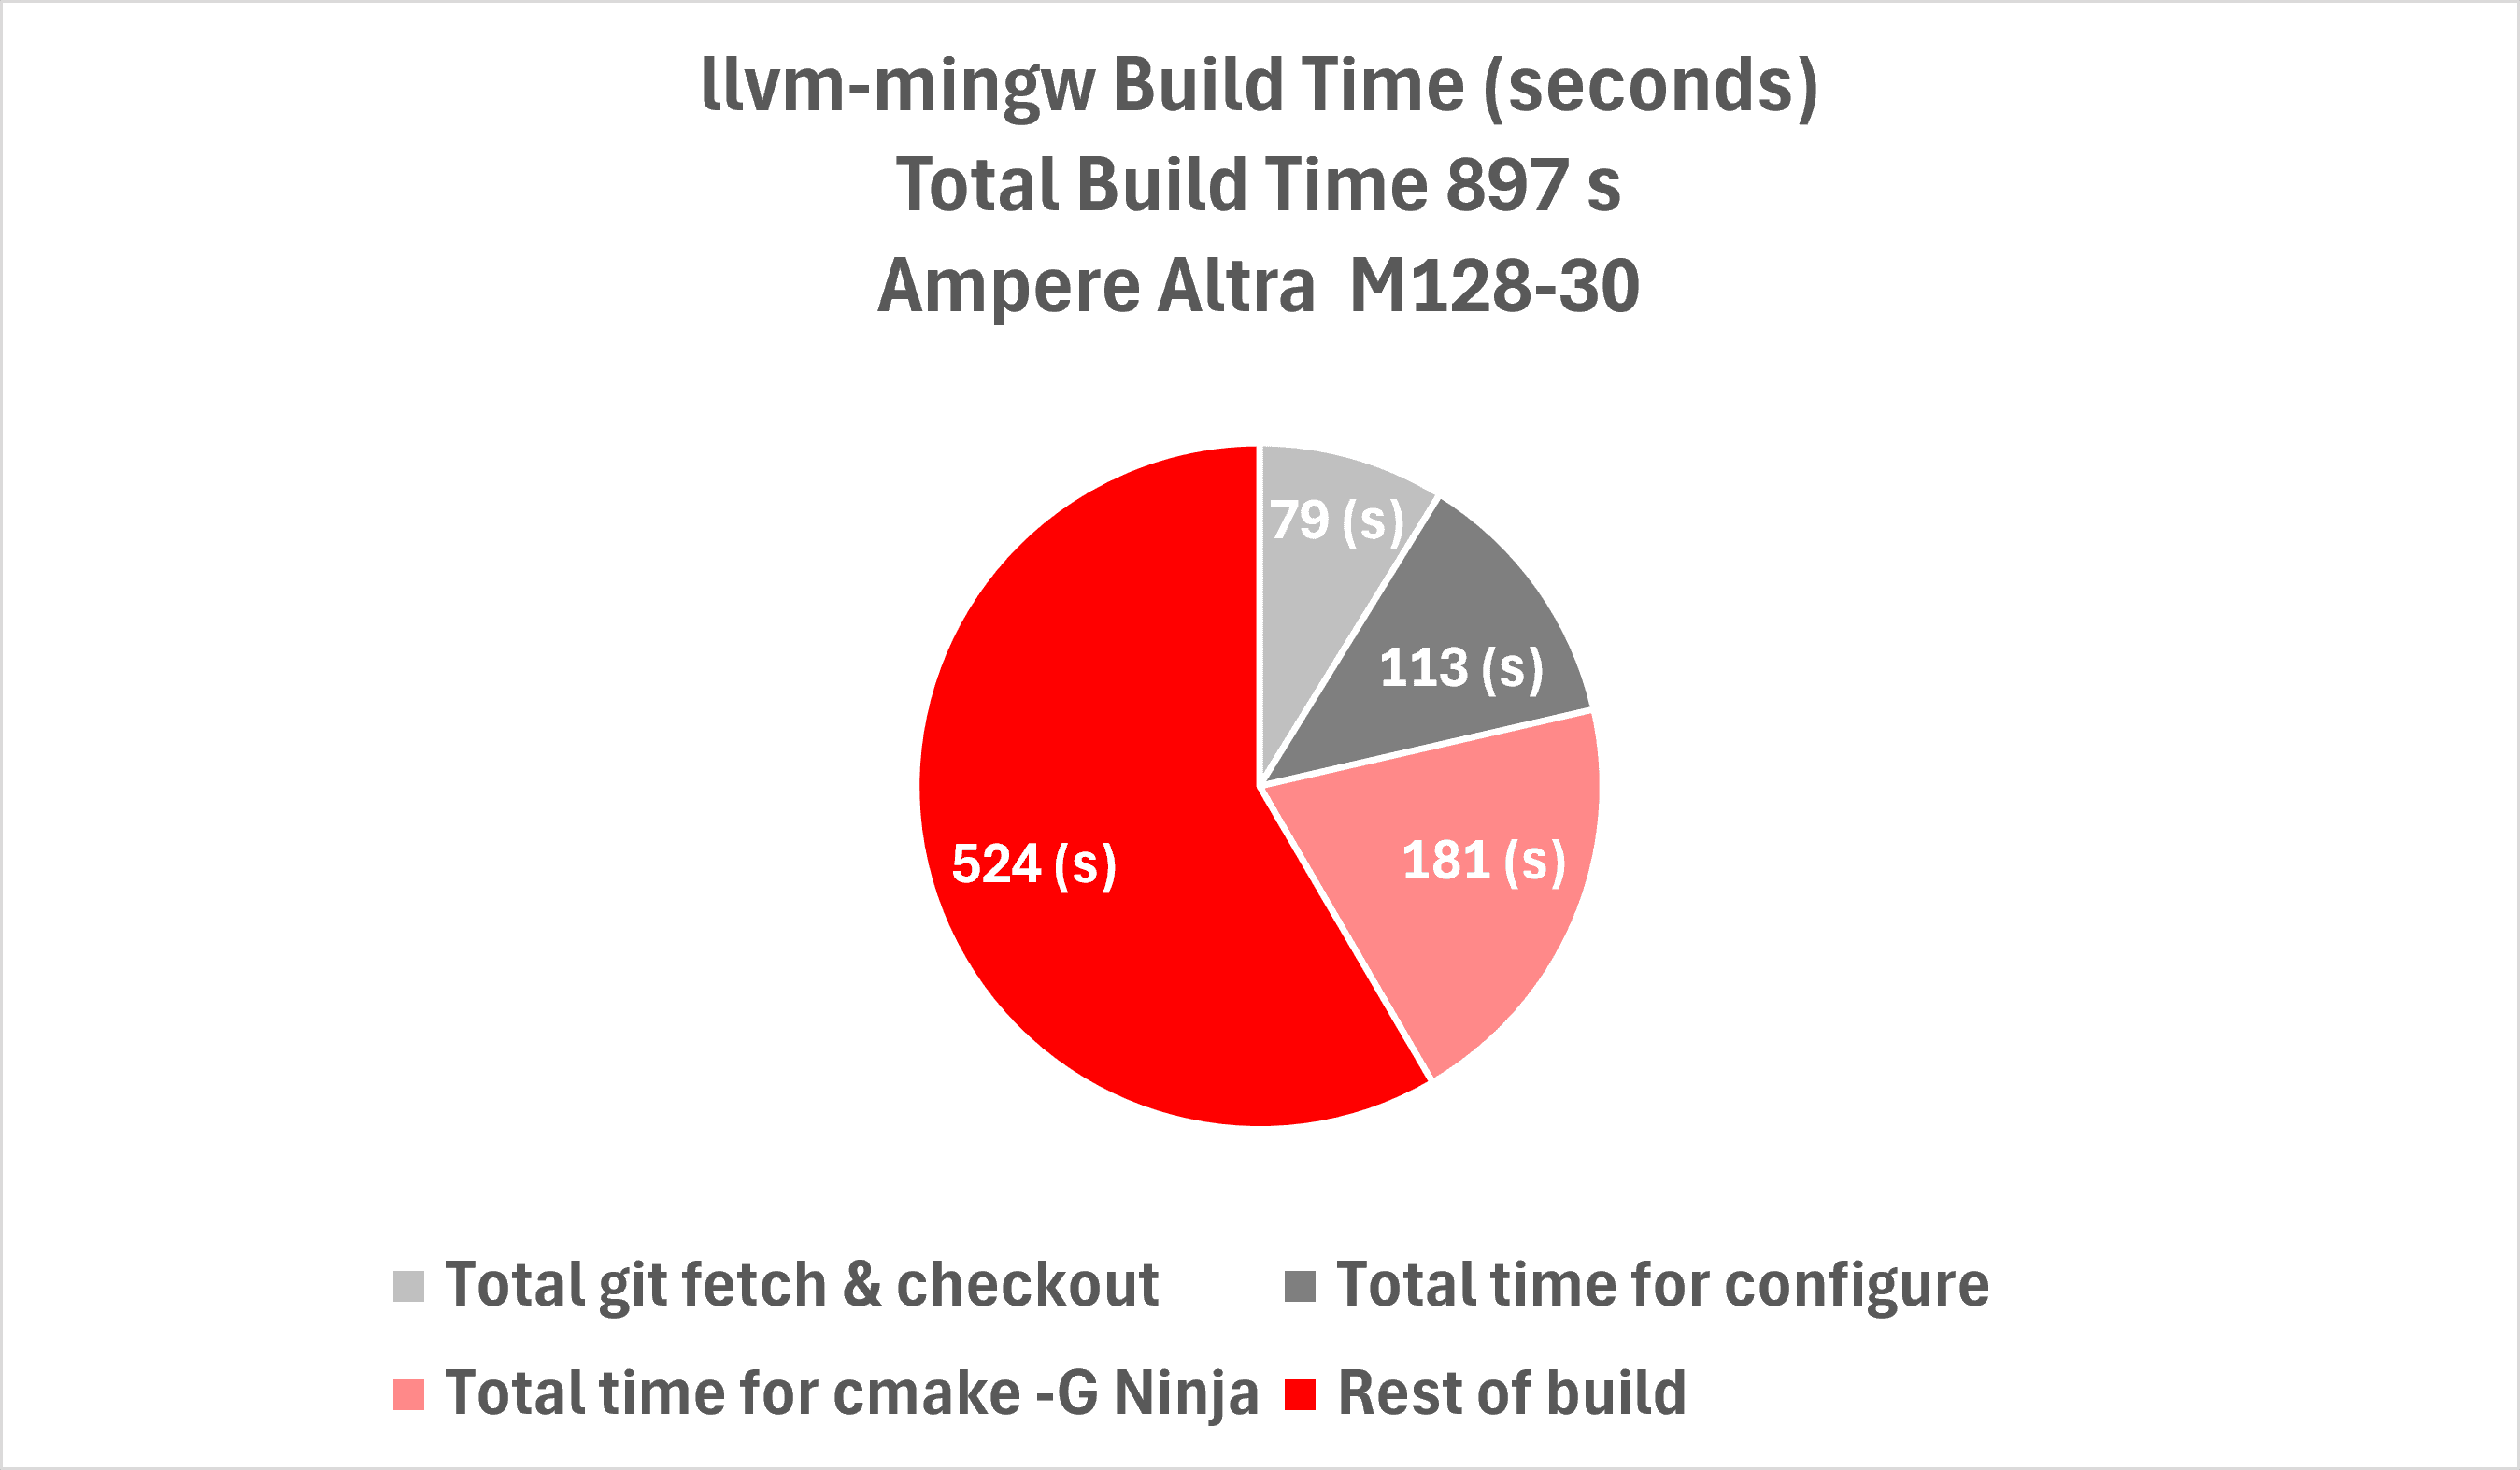
Figure 3: Breakdown of build, based on adding instrumentation to measure its phases. This shows a large fraction of the build is due to running configuration scripts (cmake -G Ninja and configure), which are serialized and limit scaling.
CPU Performance Governor
The CPU frequency governor in Linux is the kernel mechanism that controls a range of performance and power management related features for each CPU core. It can be used to tell CPU cores to run at maximum frequency, maximum power efficiency, or to dynamically scale on demand. You can see what the current setting is for all CPU cores with the command:
cat /sys/devices/system/cpu/cpu*/cpufreq/scaling_governor
The possible values for Linux are:
- powersave: Prioritizes energy efficiency, but modern CPUs can still ramp frequency under load. A good option for power-limited workloads and laptops
- ondemand/conservative: Ramps up frequency under load, and down when idle. conservative ramps up and down more slowly than ondemand
- performance: Ensures the CPU cores are always running at maximum frequency
- schedutil: A common default for modern Linux distributions, uses scheduler utilization metrics to adjust frequency
If your CPU cores are not running at their maximum frequency, or if they need to ramp up to maximum frequency when you start a build, this can have a huge impact on build times. By explicitly tuning all CPU cores to be in performance mode, we can maximize build throughput for CPU-bound workloads like software compilation.
You can manually set the governor to performance mode using either the cpupower utility, or by changing the setting that we viewed earlier on the command line:
echo performance | sudo tee \ /sys/devices/system/cpu/cpu*/cpufreq/scaling_governor
These changes are runtime only, however. If you want this change to persist across reboots, you can use the tuned service and the tuned-adm utility on Linux to configure how aggressive the power management functions of your operating system behave when your system is idle, and to ensure that the option persists across restarts. To use tuned to configure your server for high performance mode, run:
sudo systemctl enable --now tuned sudo tuned-adm profile performance
This setting should make a huge difference for high-core, CPU-bound build servers. Software compilation is a workload that benefits from cores running at maximum frequency. Dynamic governors (powersave, ondemand, conservative, schedutil) may let cores scale up only after work arrives, but this will introduce latency before full CPU power is available. For builds that spawn hundreds of parallel compilation jobs, this delay can add up across many cores and many files. Explicitly setting all cores to performance, the governor ensures that every core is immediately available at peak frequency, maximizing throughput for CPU-bound workloads.
Performance Governor Impact: 17% Speedup
After configuring the server to use the performance governor, we saw a 17% speedup in build time. The build running with a RAM disk improved from 1,063 to 909 seconds.
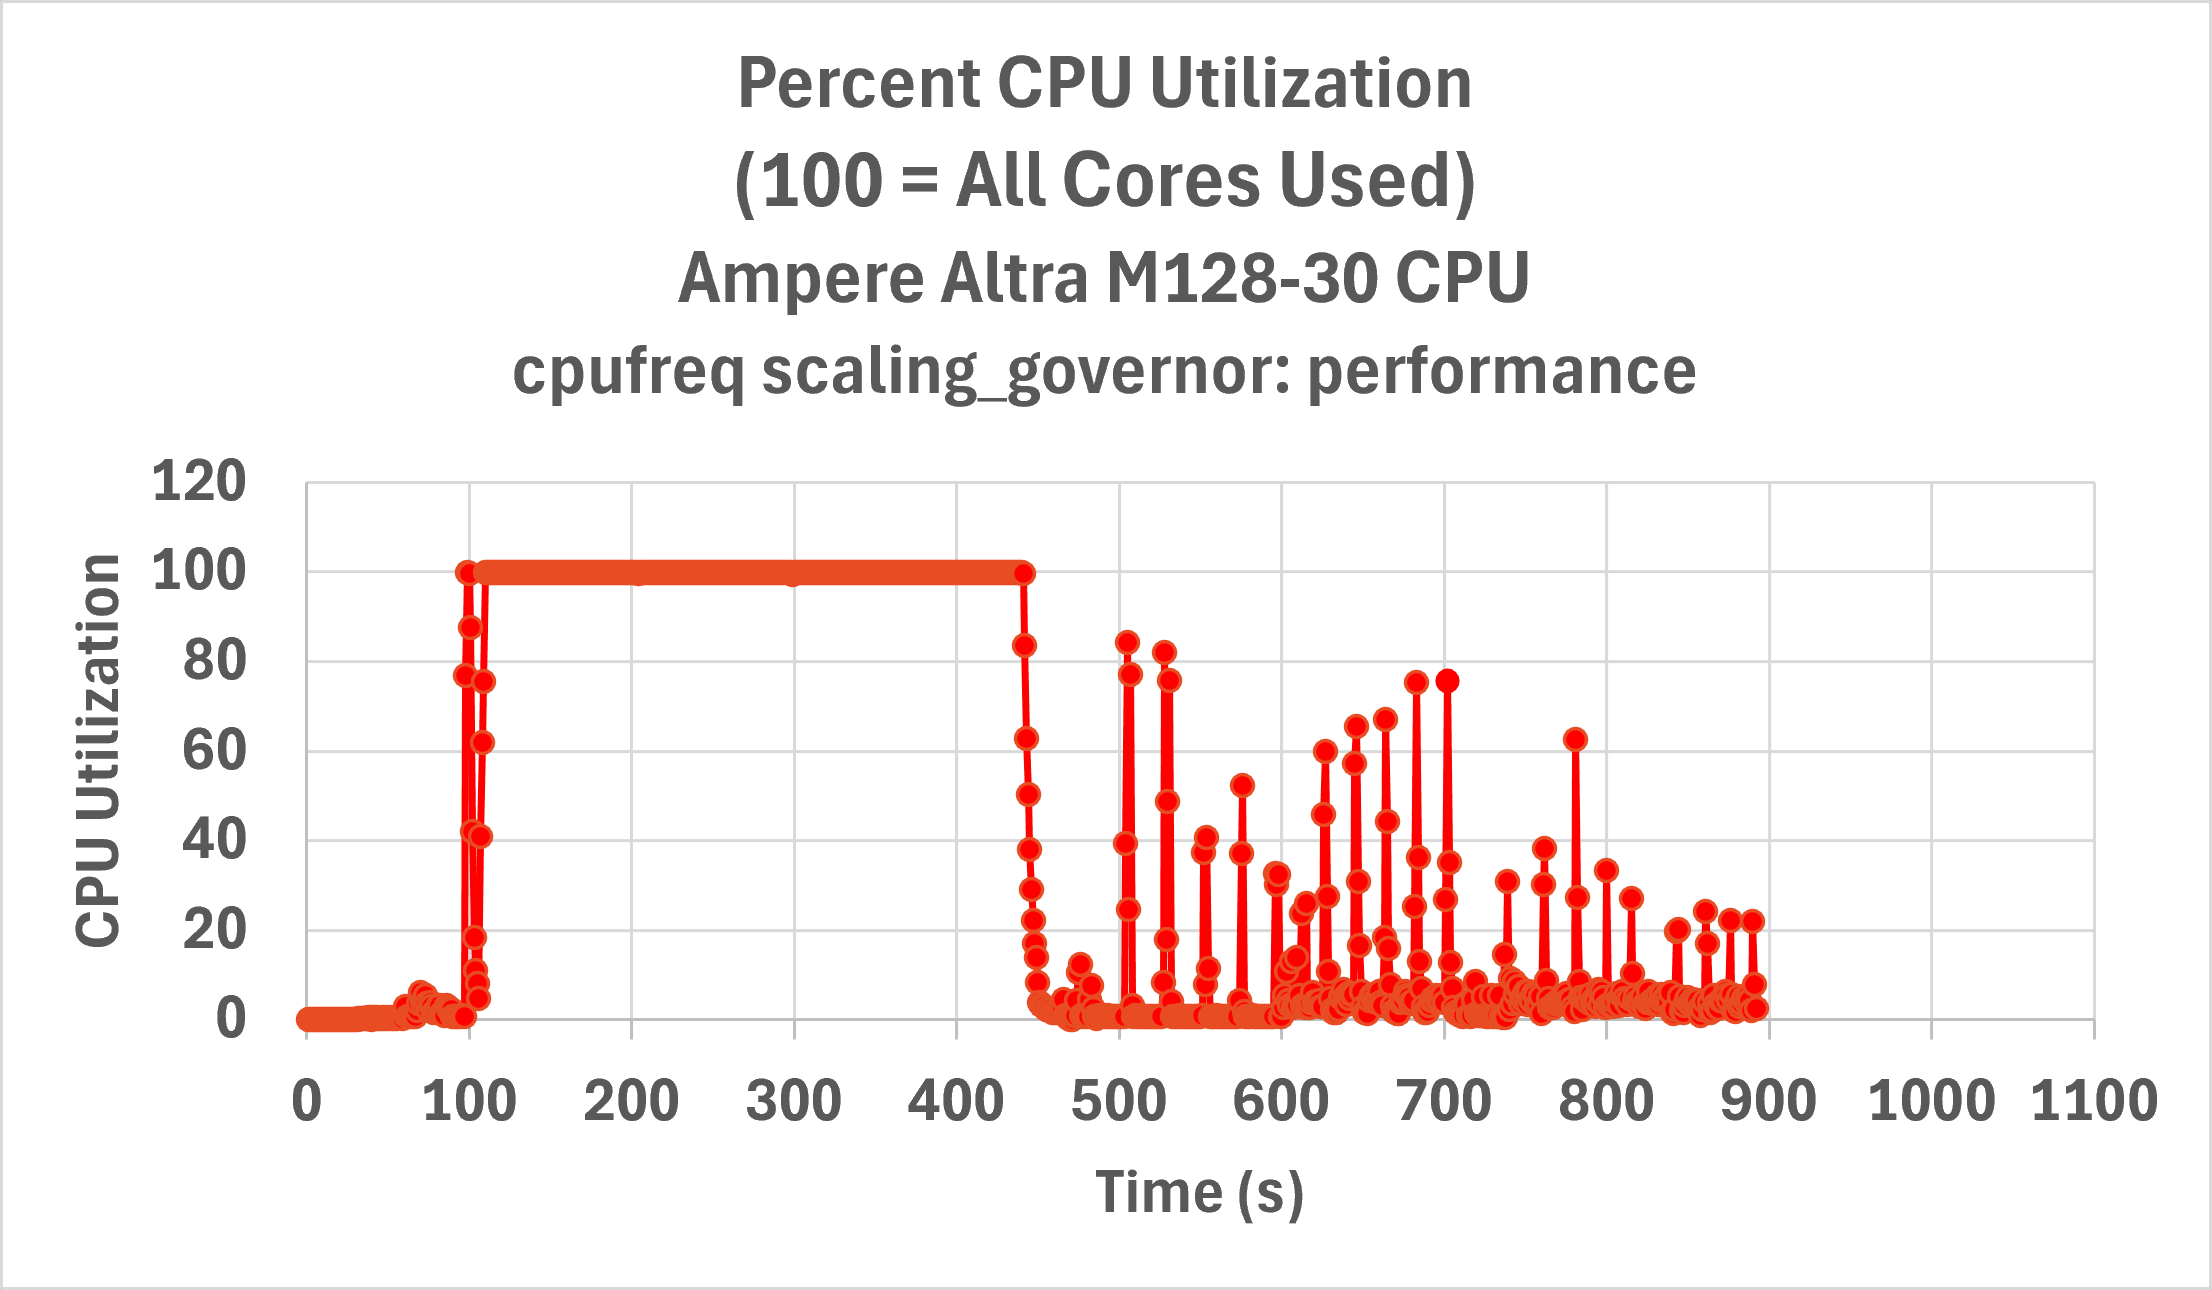
Figure 4: Server CPU utilization vs. time for initial LLVM-MinGW after setting the CPU performance governor, we observed a 17% speedup in build time.
CONFIG_HZ – the Heartbeat of the Linux kernel
Have you ever tried to work on multiple tasks at the same time—say, composing an email while preparing a presentation, and attempting to characterize and fix a software bug? This is inefficient for humans, because we need time to stop working on one task, gather enough context for the new task, and regain full efficiency—a process we call context switching. CPU cores experience a similar overhead when changing the task they are executing. They must load the instructions and data for the new task into L1 and L2 caches, evicting the old context in the process, and re-fill the CPU pipeline with new instructions. This whole process can cost hundreds to a few thousand CPU cycles on modern CPUs. With cores operating at 3 GHz (three billion CPU cycles per second), that means each context switch can incur an overhead of around one microsecond.
Inside the kernel process scheduler, there is a separate heartbeat, as the Linux kernel determines which process will get access to each CPU core, based on its priority, how long it has been waiting for a time slice, and a few other criteria. The kernel compile-time parameter CONFIG_HZ determines the frequency that the scheduler makes these decisions, potentially triggering a context switch as it evicts one process and gives another process a time slice. By default, on most Linux distributions, the kernel is compiled with an idle tickless kernel (the kernel build option CONFIG_NO_HZ=y) and a timer frequency of 250 Hz (the compile time option CONFIG_HZ_250=y, which sets CONFIG_HZ=250). That means that on busy CPU cores, the process scheduler triggers 250 times a second, or once every 4 milliseconds, but on idle CPU cores, the tick is suppressed, reducing unnecessary interrupts. When the scheduler is triggered, the kernel checks whether the current process running on the core should be preempted and replaced with another process that is waiting for CPU time.
On a build server, we typically do not want compilation processes to be preempted. These tasks are relatively short-lived for most source code files, often completing in under a second (and frequently under 100 ms) from C source to object file. As a result, if a compiler process is preempted by the kernel, context switches can represent a significant percentage of the execution time for compiling that source file. There are four possible values for CONFIG_HZ, with 100 Hz, 250 Hz, and 1000 Hz being most common. While higher CONFIG_HZ values are often chosen for workloads demanding very low latency and high responsiveness, for throughput-focused CPU-bound tasks like compilation, a lower CONFIG_HZ is generally beneficial. A lower frequency means the kernel's scheduler checks less often, reducing the likelihood of preemption for short-lived compiler processes and decreasing overall scheduler overhead. For our build server optimization, we will test the effect of setting CONFIG_HZ to 100, which sets the length of a jiffy (the time between clock ticks) to 10ms."
Running with a 100 Hz kernel improved the build time to 889.2 vs. 909.31 seconds, for an additional 2% improvement.
Building with AmpereOne
Lastly, we ran the build on the AmpereOne 192 core processor and compared its performance against the Ampere Altra 128 core processor. The build completed in 603.6 s. The graphs (Figure 5) demonstrate that the multicore-intensive build phase was effectively halved, improving from over 300 seconds to approximately 150 seconds.
Despite this significant improvement, we measured that approximately 75% of build time utilized one CPU core, with occasional spikes in demand. To further improve the server CPU utilization, one could run multiple builds and/or CI testing in parallel.
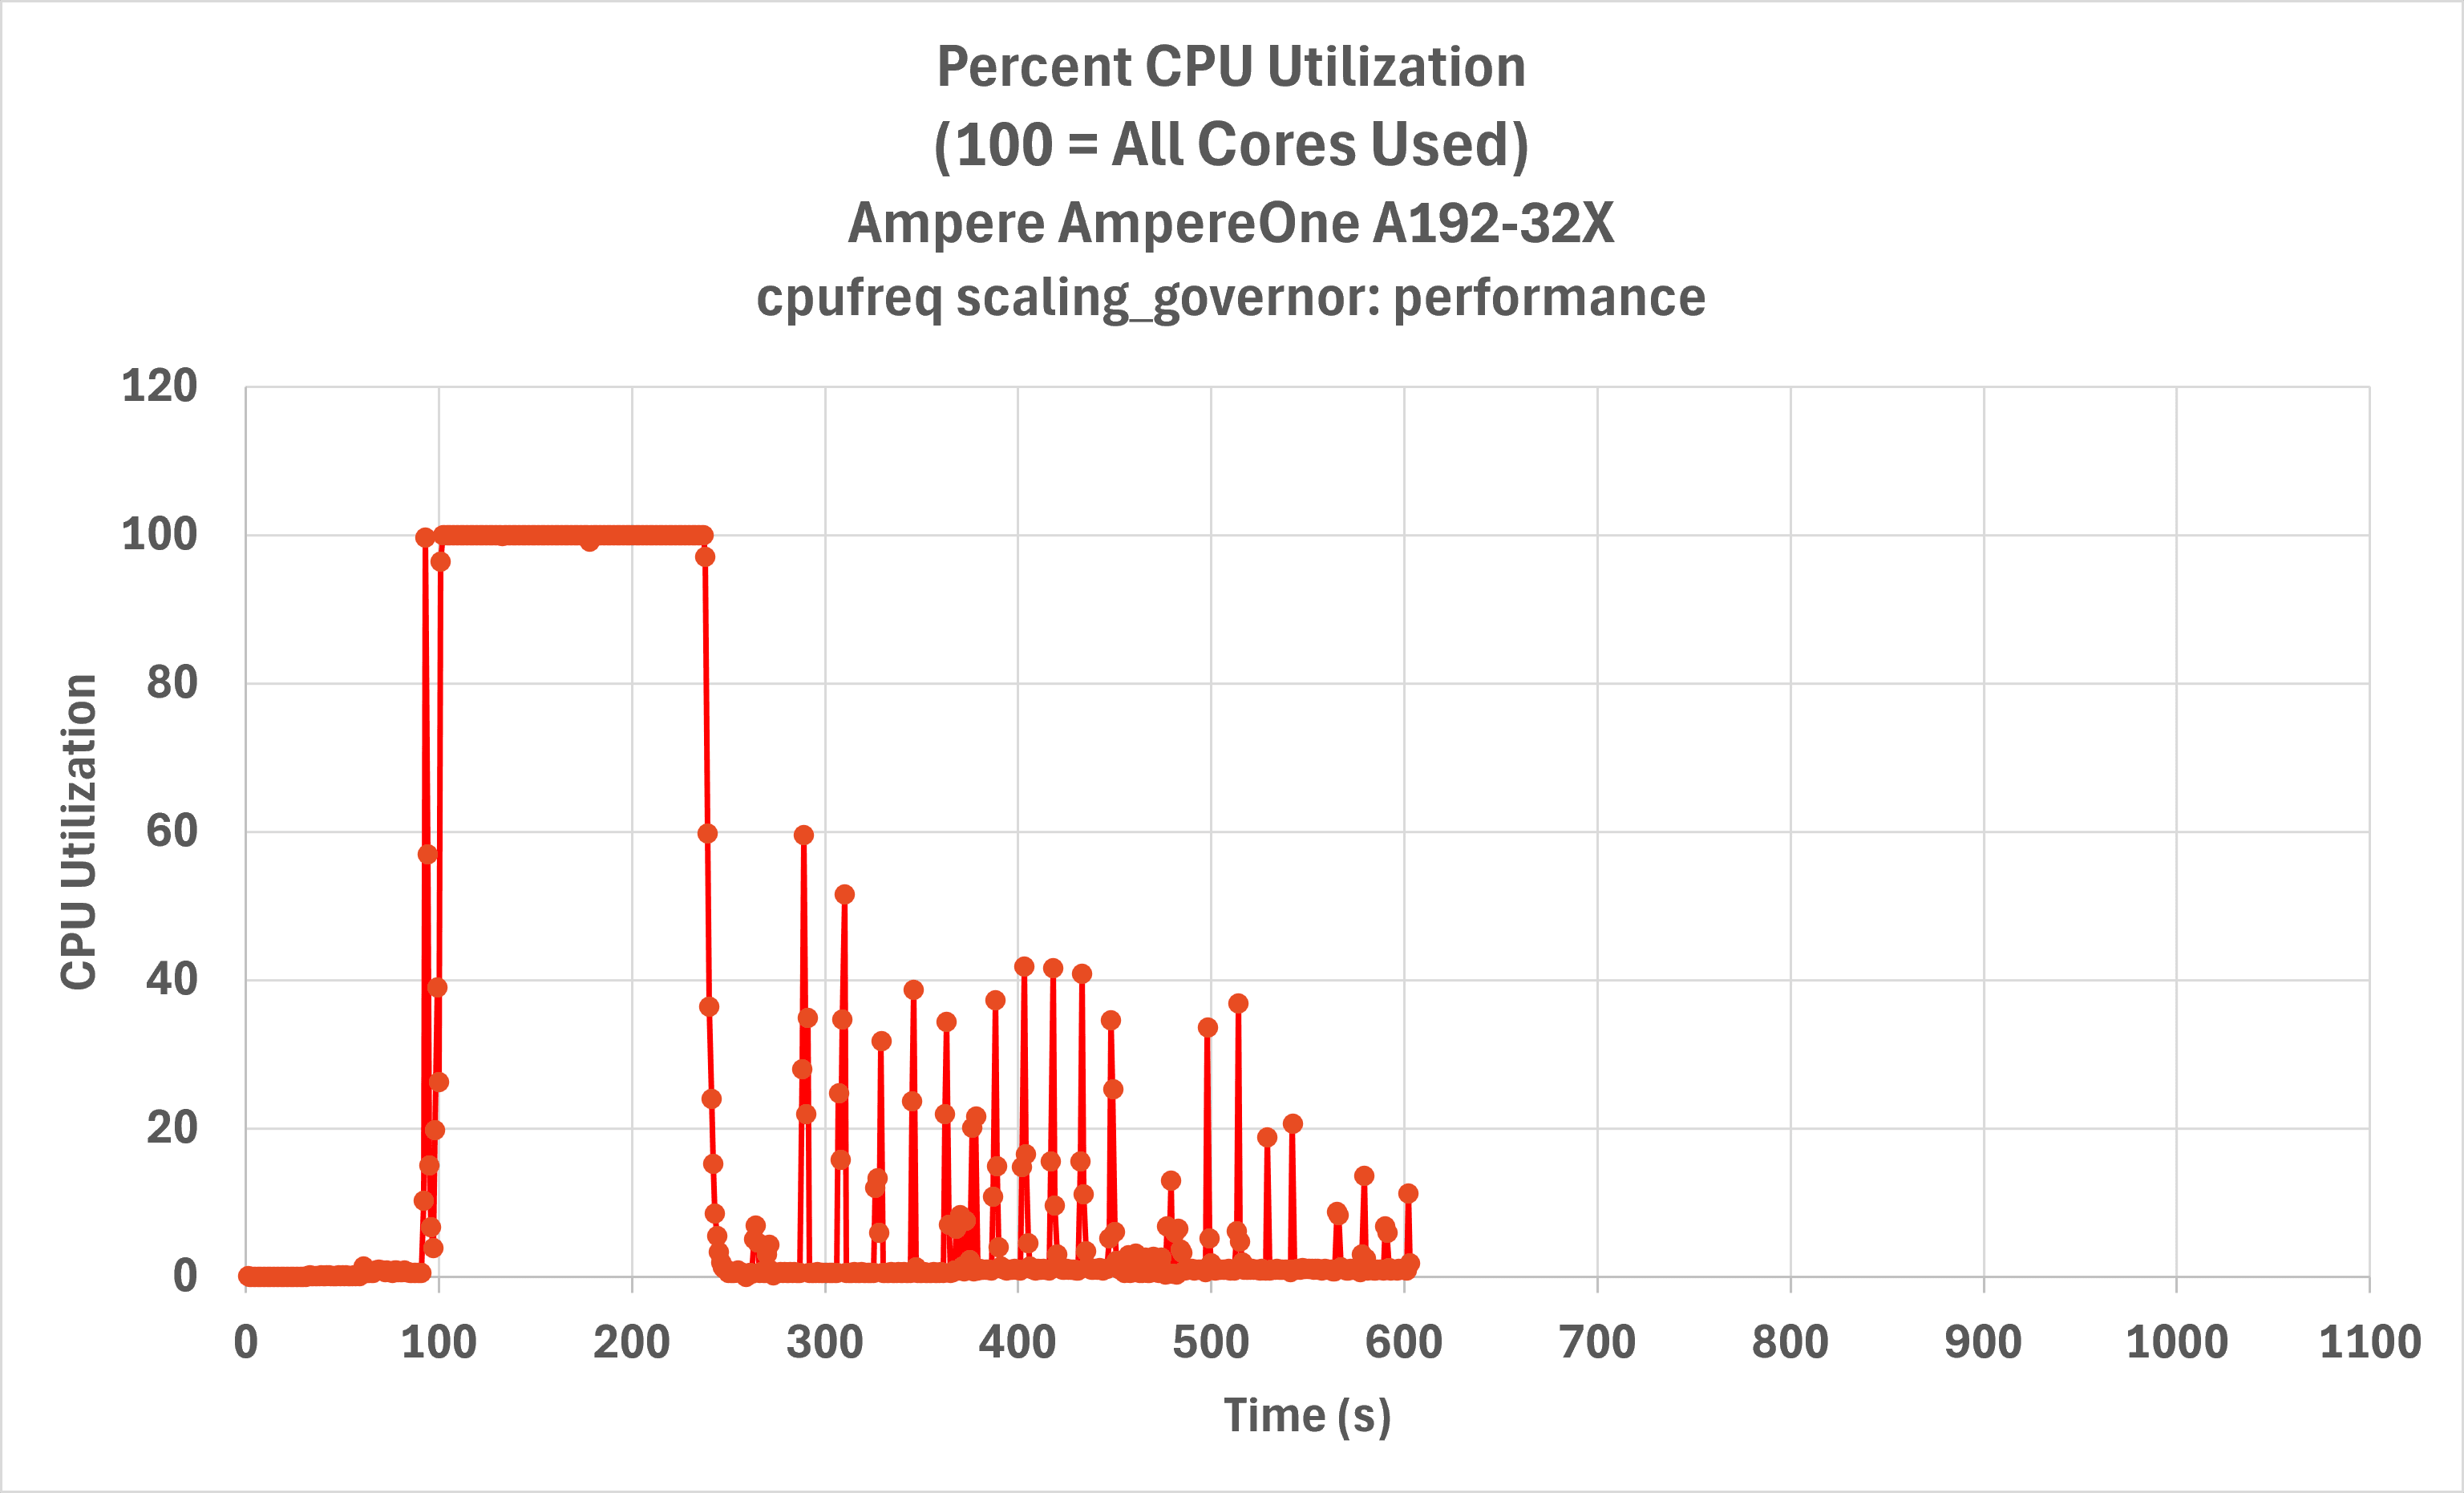
Figure 5: Server CPU utilization over time for LLVM-MinGW on Ampere Altra Max (top) vs. AmpereOne A192-32X Processor (bottom), showing a significant speedup
Summary and Recommendations
This guide explored our approach to configuring Linux application build servers for optimal performance on Ampere's Arm-based architecture. We detailed how various build systems enable parallel execution and demonstrated effective methods for measuring server utilization. Utilizing an innovative bash shell PS4 variable method, we instrumented the LLVM-MinGW build process, which involves numerous sub-projects across five different architectures. Our analysis revealed that a significant fraction of the build time was consumed by serial configuration phases. As these are inherently serial, they severely limited the overall CPU utilization of the server, even with powerful multi-core processors.
Through our targeted optimization efforts—including the use of RAM disks, setting the CPU performance governor, and tuning kernel parameters like CONFIG_HZ—we significantly improved build throughput for this specific project. Our findings also highlighted that for complex projects with persistent serial bottlenecks, the ultimate performance gains on high-core systems often come from parallelizing multiple independent builds or CI testing workflows.
Recommendations: We encourage you to apply these optimization strategies to your own Ampere-based build servers. To efficiently utilize the resources on a multi-core dedicated build server, we recommend that you implement the following recommendations:
- Implement parallel build flags – this enables the critical compute-intensive phase of builds to completely saturate available cores.
- Configure the performance CPU governor – ensure that your build server cores are not reducing performance by aggressively entering power saving mode.
- Consider CONFIG_HZ adjustments to unleash the full potential of your hardware – context switches can have a significant impact, and slowing the heartbeat of a system minimizes them.
- To improve server throughput, explore offsetting build jobs, or run testing jobs simultaneously. We have seen that configuration and linking stages do not scale as efficiently to multiple cores. If you start builds offset by time, or run jobs with different compute demands, you can execute these single-threaded parts of the build process in parallel with the intensive build stages of other jobs. How to optimally schedule build jobs to maximize throughput is left as an exercise to the reader.
For further discussion, share your experiences, or seek additional guidance, join the Ampere developer community forum at https://community.amperecomputing.com.
All data and information contained herein is for informational purposes only and Ampere reserves the right to change it without notice. This document may contain technical inaccuracies, omissions and typographical errors, and Ampere is under no obligation to update or correct this information. Ampere makes no representations or warranties of any kind, including but not limited to express or implied guarantees of noninfringement, merchantability, or fitness for a particular purpose, and assumes no liability of any kind. All information is provided “AS IS.” This document is not an offer or a binding commitment by Ampere. Use of the products contemplated herein requires the subsequent negotiation and execution of a definitive agreement or is subject to Ampere’s Terms and Conditions for the Sale of Goods.
System configurations, components, software versions, and testing environments that differ from those used in Ampere’s tests may result in different measurements than those obtained by Ampere.
©2026 Ampere Computing. All Rights Reserved. Ampere, Ampere Computing, AmpereOne, and the ‘A’ logo are all registered trademarks or trademarks of Ampere Computing. Arm is a registered trademark of Arm Limited (or its subsidiaries). All other product names used in this publication are for identification purposes only and may be trademarks of their respective companies.
Ampere Computing® / 4655 Great America Parkway, Suite 601 / Santa Clara, CA 95054 / amperecomputing.com
Related Content
Ampere Computing LLC
4655 Great America Parkway Suite 601
Santa Clara, CA 95054


